• Italiano
    • English
    • Deutsch
    • Español
    • Français
    • Русский
    • 中文 (中国)
    • Türkçe
    • Ελληνικά
    • Magyar
    • Српски језик
    • Lietuviškai
    • Bahasa Indonesia
    • Slovenčina

info@c-tech-implant.com

+39 051 66 61 817

+ 49 721 60 95 32 38

Slide Mission, Internazionale, Garanzia, Certificazione, prodotti Compatibili

臨床病例

Advantages of guided surgery, predictability in small spaces

Written by feRKzzCTo0 on . Posted in EL – Esthetic Line, GS – Guided Surgery, Henriette Lerner, 导引式植牙, 臨床病例

by Doctor Henriette Lerner, HL-DENTCLINIC DR. STOM. MEDIC.

In this case, the patient has a genesis of the two upper lateral incisors.
Having created the space with the help of the orthodontic specialist, we first proceed with a Digital Smile Design and then with the digital planning of the two implants in comparison with the new aesthetics.

Guided surgery in the jaw and mandible

Written by feRKzzCTo0 on . Posted in EL – Esthetic Line, GS – Guided Surgery, Henriette Lerner, 导引式植牙, 臨床病例

by Doctor Henriette Lerner, HL-DENTCLINIC DR. STOM. MEDIC.

In this case, it is necessary to use all the digital tools available – detection of joint movements, digital smile design and guided surgery, with the aim of having predictability and accuracy. For the future aesthetic part and function, the evaluation took place before the surgery.

Guided surgery with bone graft

Written by feRKzzCTo0 on . Posted in EL – Esthetic Line, GS – Guided Surgery, Henriette Lerner, 导引式植牙, 臨床病例

by Doctor Henriette Lerner, HL-DENTCLINIC DR. STOM. MEDIC.

In this case it is shown how it is still possible to work in guided surgery and consequently perform bone grafts where necessary.
The advantage in a difficult case like this is to design the dental implants with a surgical guide, in order to maintain their correct positioning.
Finally, the aesthetic project was evaluated prior to surgery.

Full arch case: immediate implant placement with guided surgery and immediate loading

Written by feRKzzCTo0 on . Posted in Catarina G. Rodrigues, GS – Guided Surgery, Manuel D. Marques, MUA, 导引式植牙, 臨床病例

Catarina G. Rodrigues, DDS, MSc – Manuel D. Marques, DDS

A 57-year-old woman presented to a private practice with the chief complaint being “I’m self-conscious about the appearance of my teeth. Also, I’ve lost most of my teeth and I cannot eat well because of that”. The clinical and radiographic examination revealed the absence of all teeth except the central incisors and right lateral incisor in the upper. In the lower, partial edentulism, severe bone loss, and multiple periapical infections were diagnosed. Also, the patient’s function and aesthetics were seriously compromised (Fig 1-11).

使用引导手术和一次性概念的3单元桥接种植修复

Written by feRKzzCTo0 on . Posted in Catarina G. Rodrigues, GS – Guided Surgery, Manuel D. Marques, MUA, ONE TIME Clever Concept, 传统种植学, 导引式植牙, 臨床病例

Catarina G. Rodrigues, DDS, MSc – Manuel D. Marques, DDS

患者男性、30岁。24号、25号和26号牙齿缺失,牙周情况良好、咬合空间尚可。c 治疗计划:24号、26号牙位植入两颗种植体,种植桥修复。
在数字化导板的引导下,植入两颗西泰克美学种植体。
西泰克美学植体、斜肩台加平台转移、保证美学效果,多种螺纹增加初期稳定性。
选择戴入两颗穿龈高度为3的最新的西泰克“ONETIME”基台、并在基台上端加上覆盖螺钉
术后X光片、角度位置良好。

Full-mouth implant rehabilitation with two different abutment systems: Multi-unit and Omni system

Written by feRKzzCTo0 on . Posted in Catarina G. Rodrigues, EL – Esthetic Line, GS – Guided Surgery, Manuel D. Marques, MUA, OMNI, 传统种植学, 导引式植牙, 臨床病例, 骨再生

Catarina G. Rodrigues, DDS, MSc – Manuel D. Marques, DDS

A 66-year-old man presented to a private practice seeking a fixed restoration to replace his terminal dentition. The intraoral and radiographic examination revealed partially edentulous arches, the presence of periapical infections and extensive carious lesions on several teeth, significant attachment loss, and tooth mobility (Fig.1-3).

Both aesthetics and function were compromised. The vertical dimension of occlusion was reduced due to loss of posterior support and excessive wear. Following a proper diagnosis, the treatment plan proposed was the extraction of all the remaining teeth, placement of five implants in the maxilla and six implants in the mandible, immediate loading of the implants, and – as final restorations – full arch screw-retained prosthesis (Fig.4).

In order to perform proper pre-surgical planning of the case, initial records of the patient were obtained: intra and extra-oral photographs, digital impressions, and CBCT. A 2D facially driven digital smile design was made to aid in the planning of the position and dimension of the teeth for the future interim prosthesis.

Then, using a specific 3D CAD software, a digital diagnostic wax-up was generated and 3D printed. A silicone index was obtained from the 3D printed model and filled with bis-acryl resin to produce trial restorations and evaluate the 2D smile planning on the patient’s mouth (Fig.5-7).

The approved try-in was then scanned and superimposed with the preoperative intra-oral scan and CBCT to digitally plan the implant surgery. Once the future implant positions were defined, they were translated into the design of the surgical templates (Fig.9-10).

The prosthetic abutments were also planned in the same software as the implants.
Due to the patient’s systemic conditions, was decided to perform first the upper surgery and 3 months after the lower one. In the upper arch, after extraction of all maxillary hopeless teeth, implant sites were prepared through the guide according to a specific drilling protocol, and using C-Tech guided surgery kit, followed by implant placement.

All implants were torqued with at least 45Ncm to ensure enough primary stability for immediate loading. After implant placement, multi-unit abutments were inserted and torqued in place with 25 Ncm. A full arch provisional screw restoration was delivered the same day (Fig.8).

The implant surgery in the mandible was carried out 3 months after. To improve the precision of lower implant surgery, two surgical guides were used to place the implants.

The first guide was placed before any extraction and used to place implants on the molars region and right premolar region. Then, the first guide was removed, all teeth but the canines were extracted, and the second guide was seated and used to place implants on the anterior and left premolar regions (Fig. 11-13).

After implant placement, Omni system abutments were inserted and torqued in place with 25 Ncm. A full arch provisional screw restoration was delivered the same day. Post-op periapical x-rays and a panoramic x-ray were taken to ensure proper adaptation of the interim prosthesis to the implant abutments. Intra and extra-oral pictures of the immediate prosthesis were obtained (Fig. 14-19).

Three months after the lower, and six months after the upper surgery and immediate loading, we proceed with final impressions. In an occlusal view, after removing the lower fixed provisional prosthesis, we can appreciate a healthy appearance of the soft tissue (Fig. 20,21).

Finally, we deliver a full arch screw retained fixed prosthesis over multi-unit abutments in the upper arch, and a full arch screw retained fixed prosthesis over Omni system abutments in the lower arch (Fig. 22-25).

Post extractive custom healing abutment with c-tech temporary abutments

Written by feRKzzCTo0 on . Posted in Catarina G. Rodrigues, EL – Esthetic Line, Manuel D. Marques, 传统种植学, 臨床病例, 骨再生

Dr. Catarina G. Rodrigues, DDS, MSc – Dr. Manuel D. Marques, DDS

One of the main challenges during implant treatment is adequate maintenance of peri-implant soft tissues. This will have a tremendous influence on the longevity of the implant, and aesthetics of the final implant-supported restoration.

In some clinical situations, the shape of pre-fabricated healing abutments is not adequate to obtain a proper emergence profile, as they differ from the shape of the natural tooth. That will happen most of the times when placing immediate implants, right after a tooth extraction.

The use of a custom healing abutment, not only will preserve the natural soft tissue architecture, but will also, later on, facilitate the work of the restorative dentist and lab technician on the fabrication of the final crown, as the soft tissue is already developed to accept a crown with a natural size and contour (Fig. 1).

The present clinical case illustrates how to obtain a custom healing abutment using a temporary metal abutment and light-cured flowable resin composite (Fig. 2,3).


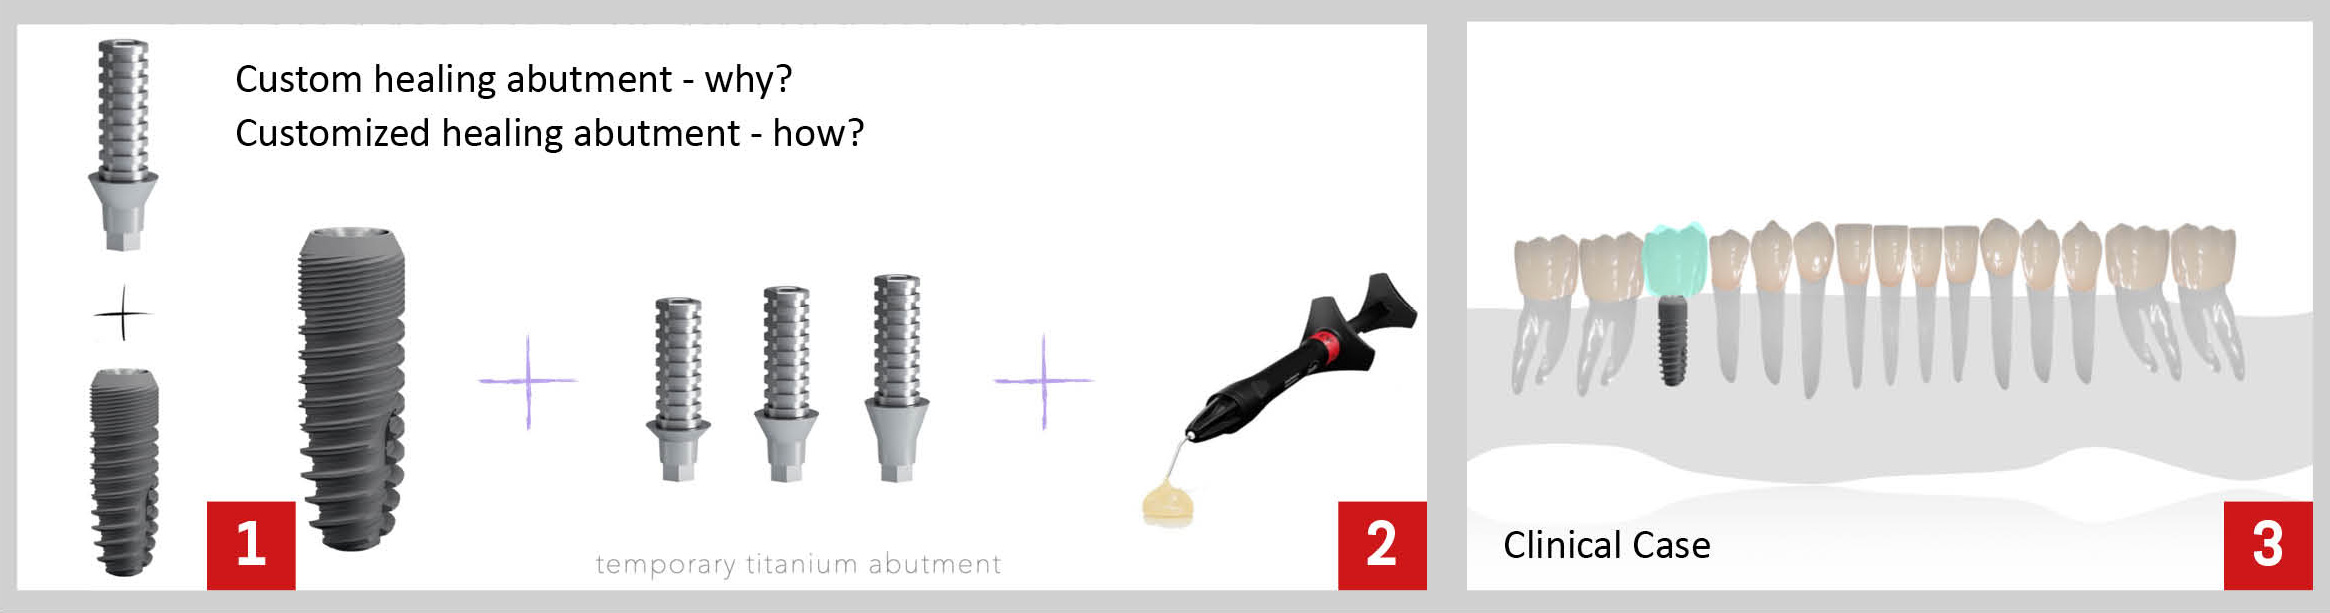
For this clinical situations, there are mainly three reasons for choosing a metal abutment over a peek one. First, the metal connection is stronger. Given the fact that we will need to screw and unscrew the abutment several times, by using an abutment with a stronger implant connection there is less risk of deforming it. Second, the surface characteristics and design of the metal temporary abutment facilitate the process of adding and retaining the resin composite. Lastly, when using the temporary metal abutment it is possible to confirm with a periapical x-ray the position of the abutment on the implant, while with peek abutments that will not be possible.

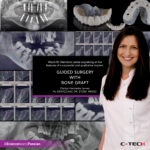
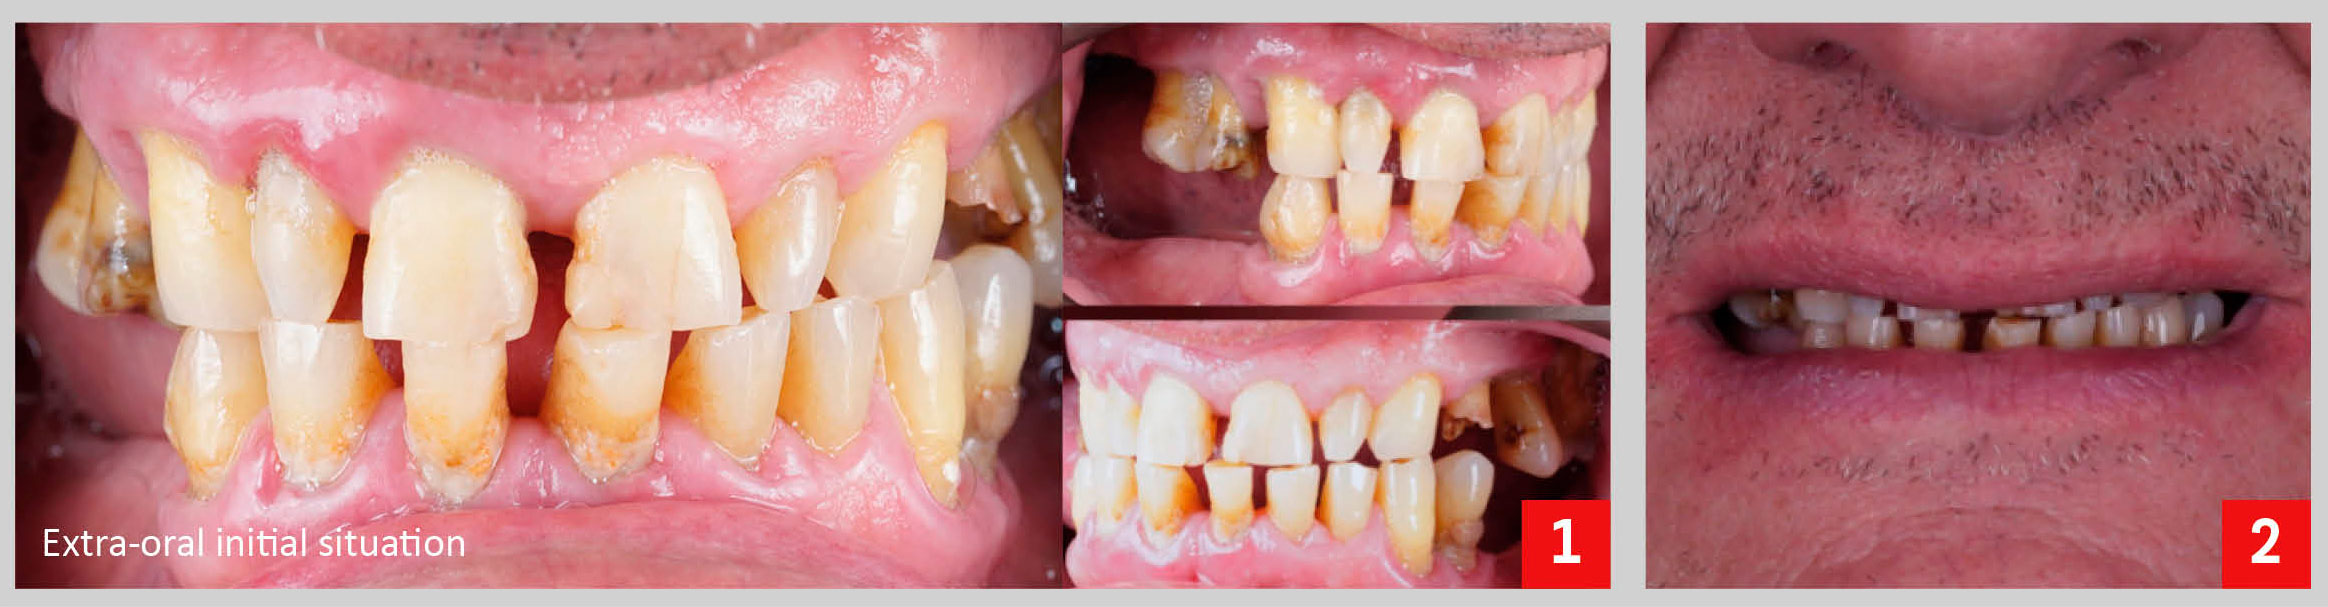
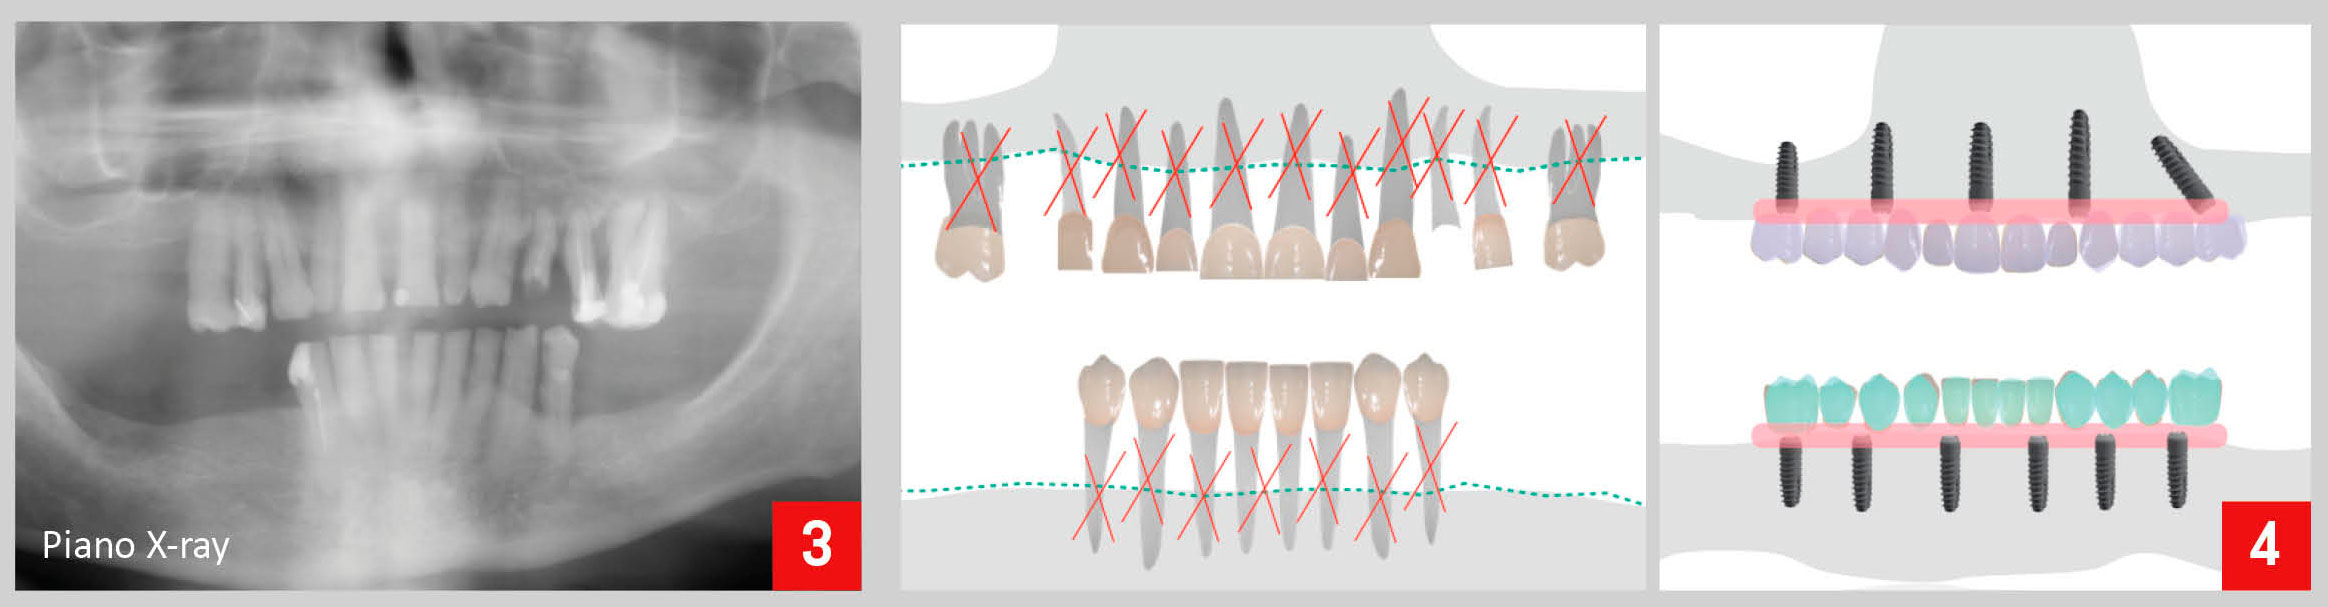
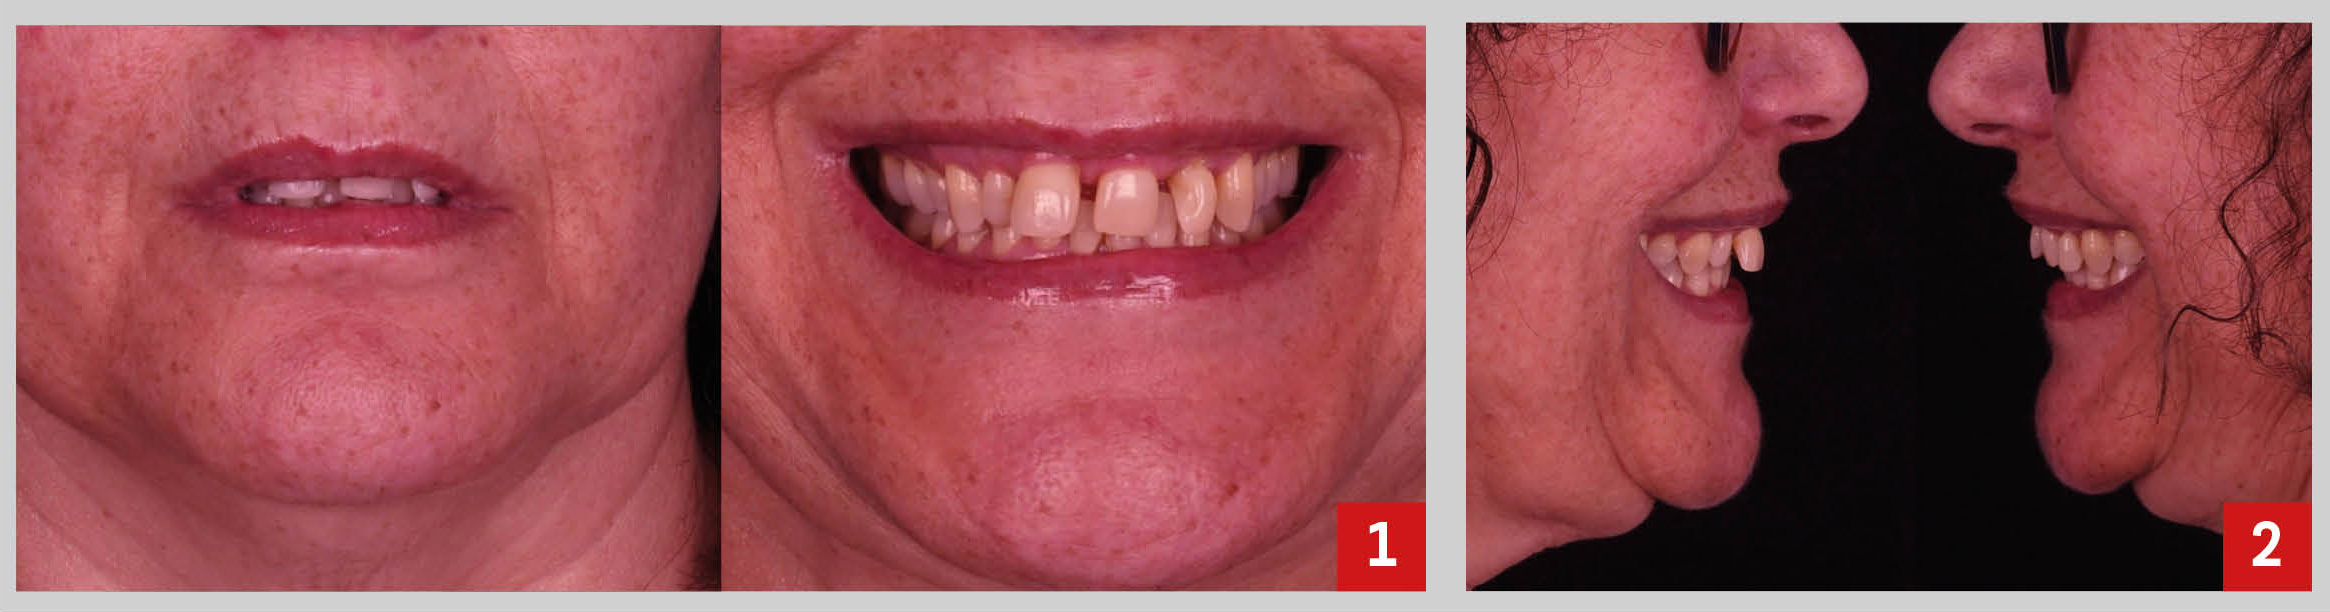
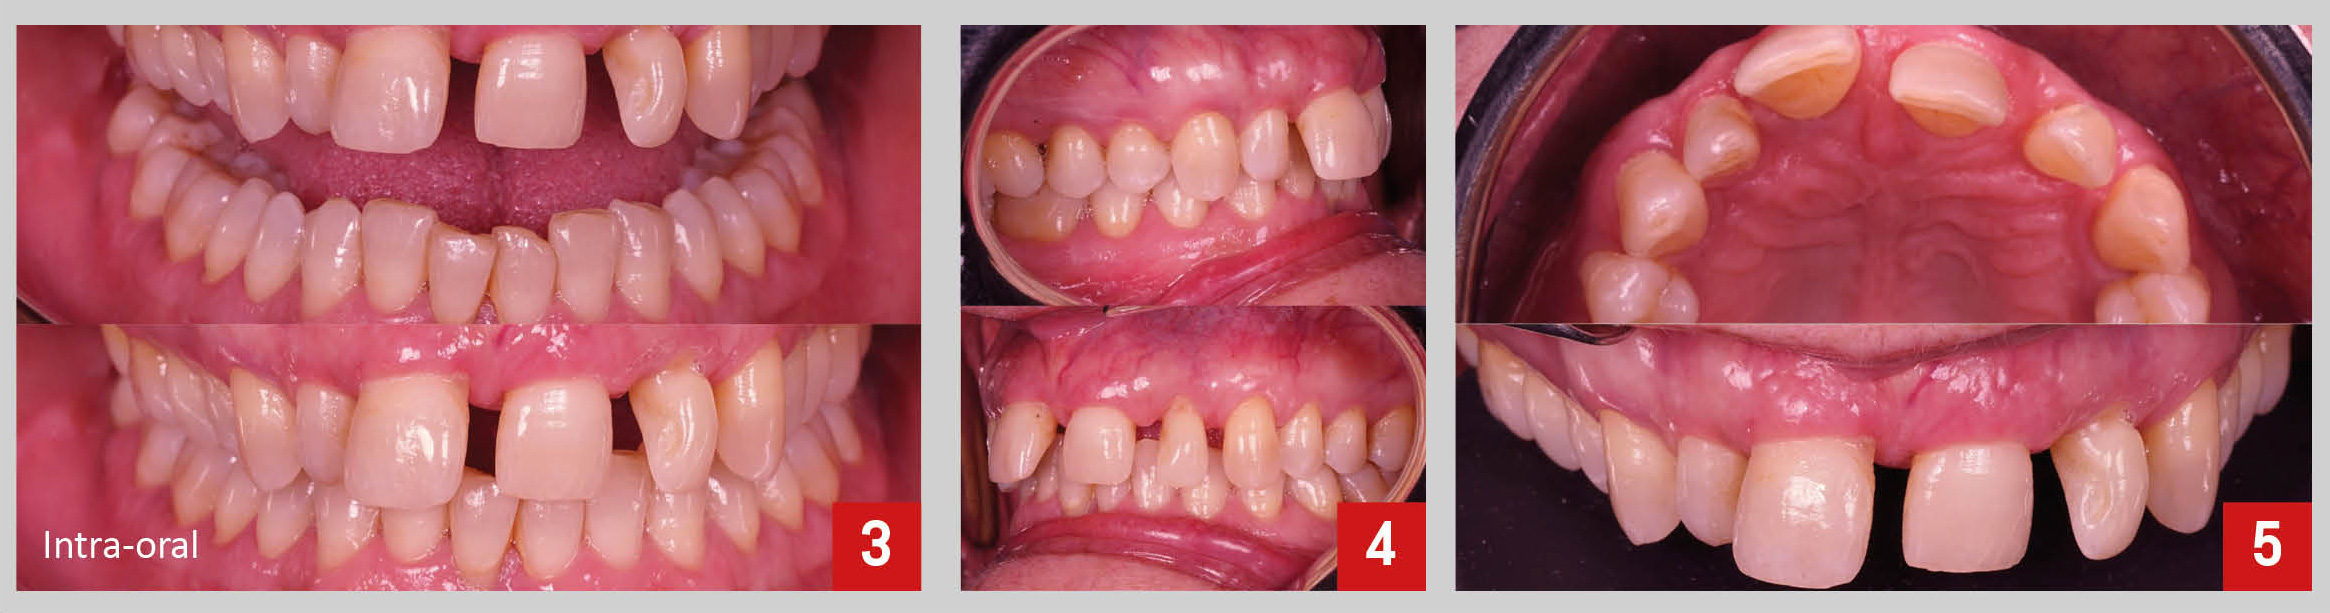
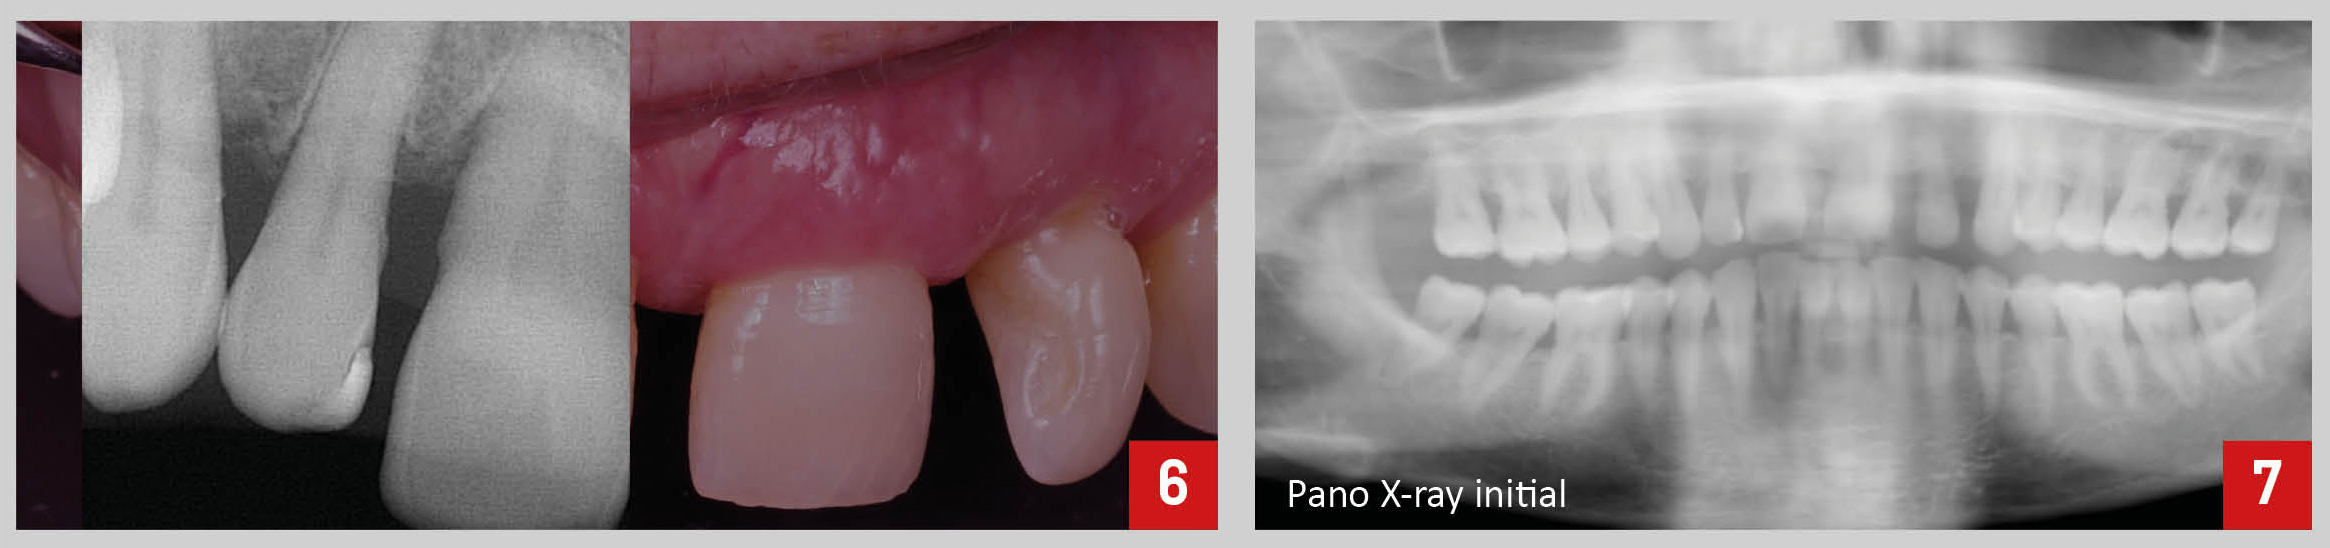
The patient presented with complaints on tooth 4.6. After a proper clinical and radiographic examination, a large apical cyst was found, besides signs of failed endodontic treatment, extensive structural loss and multiple cracks (Fig.4,5).


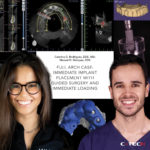
Given that the tooth was considered to have an unfavorable long-term survival, extraction and immediate implant placement was recommended as the ideal treatment plan.

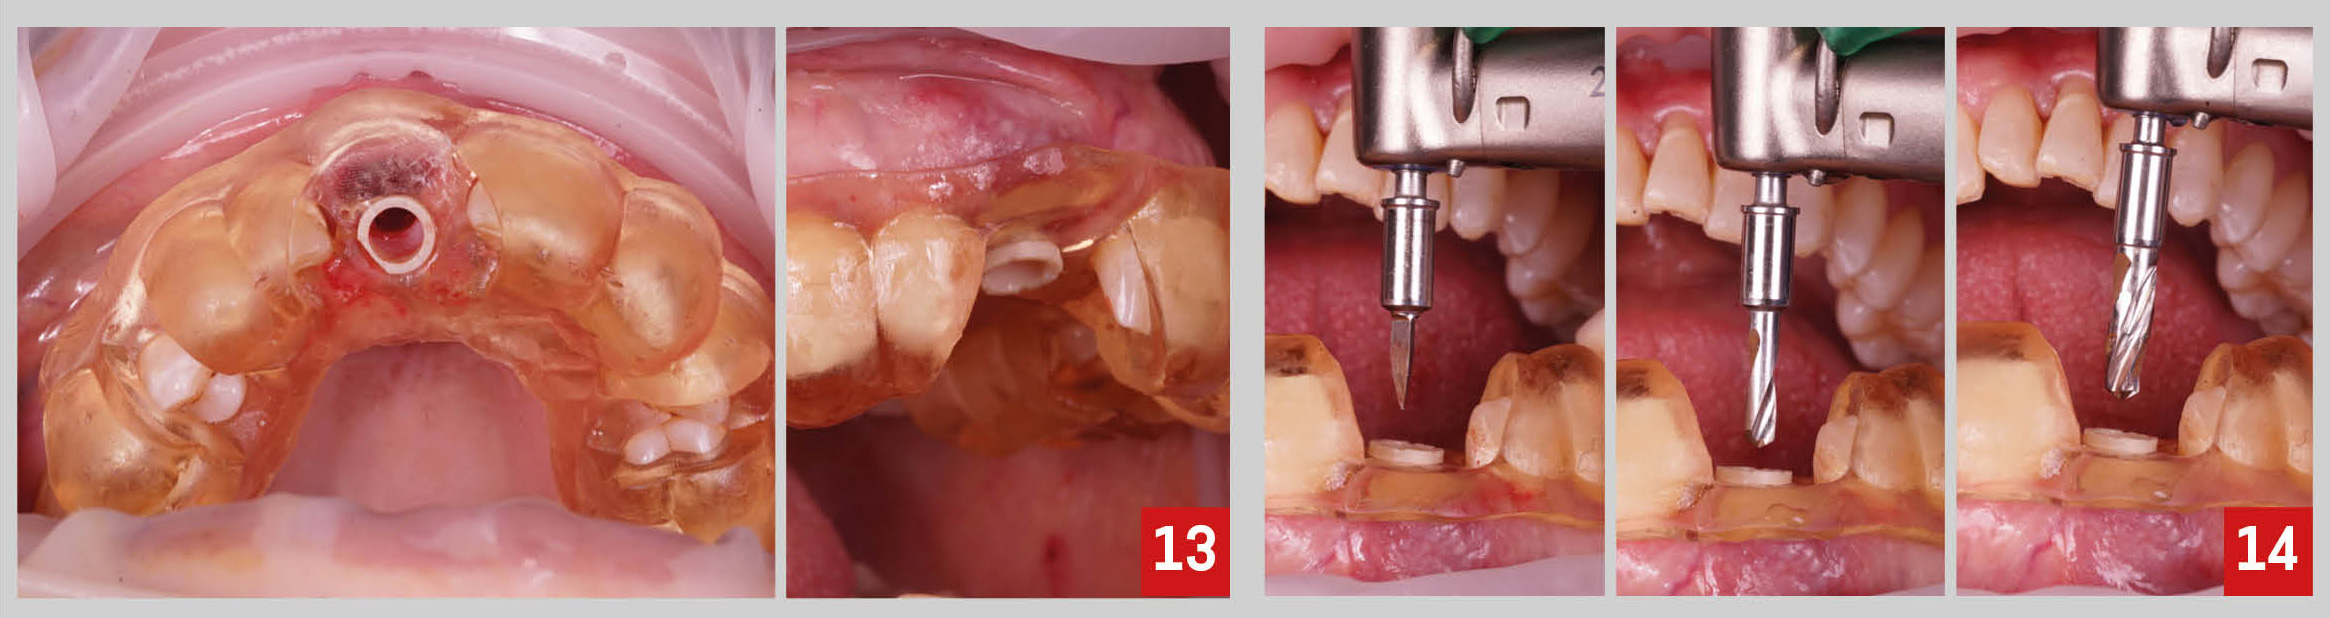
The surgical procedure consisted of atraumatic extraction of tooth 4.6, followed by immediate implant placement (Fig.6,7).

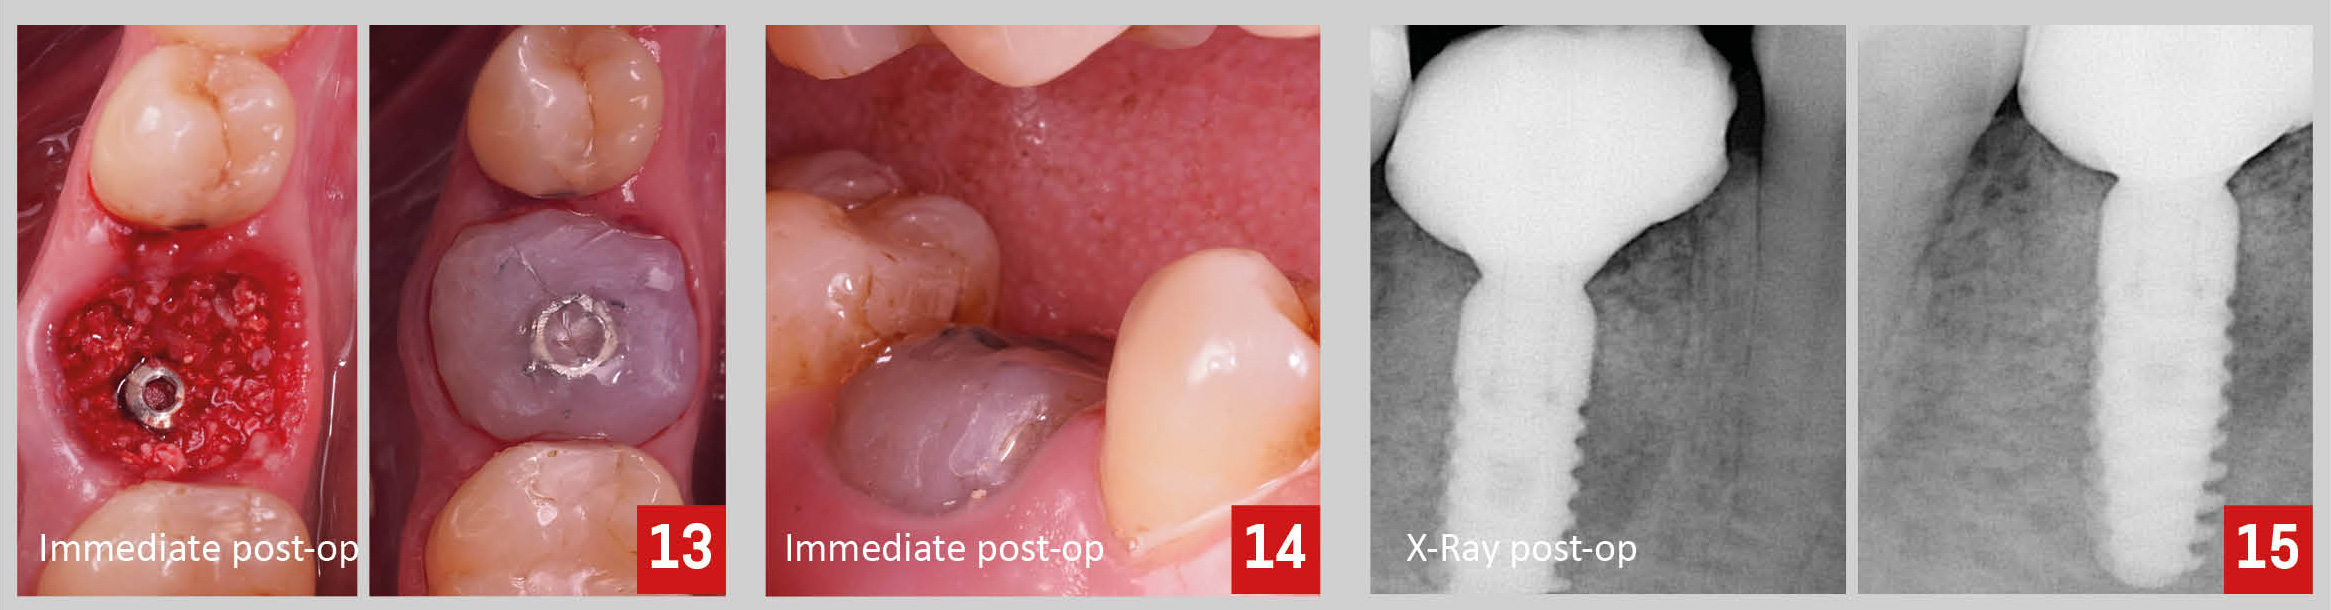
Then, a temporary metal abutment was screwed on the implant and the flowable resin composite was attached to the abutment, creating a “spider web” to help on reproducing the shape of the extraction socket to the design of the custom healing abutment (Fig.7).


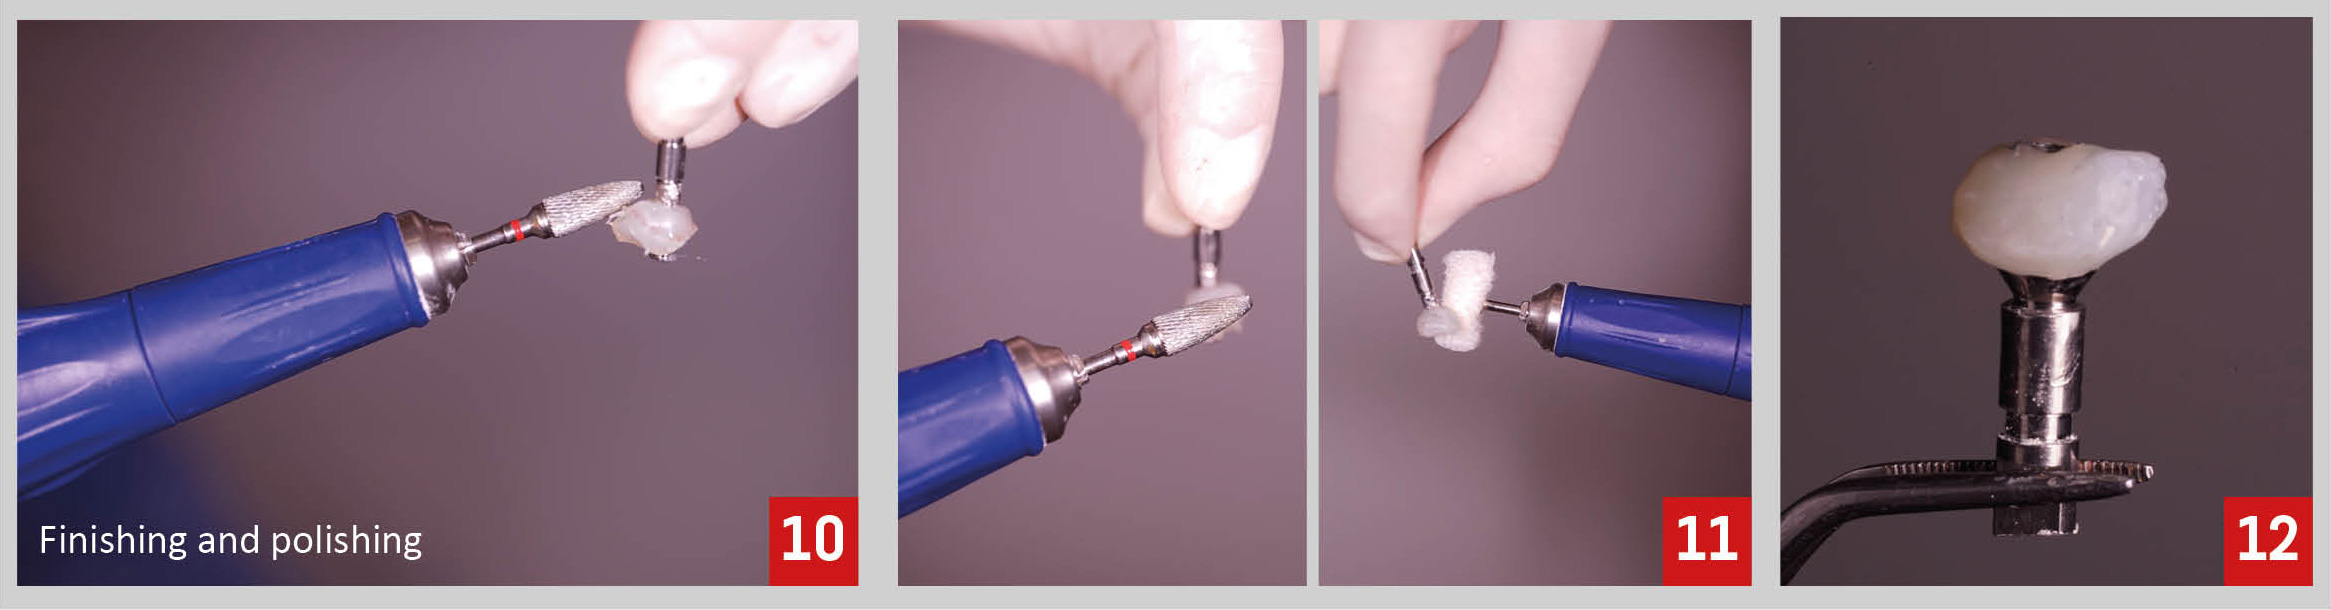
Then, the abutment was unscrewed (Fig.8), more flowable composite was add, within the limits previously defined, to create a proper emergence profile (Fig.9), and the finishing and polishing procedures were undertaken (Fig 10-12).


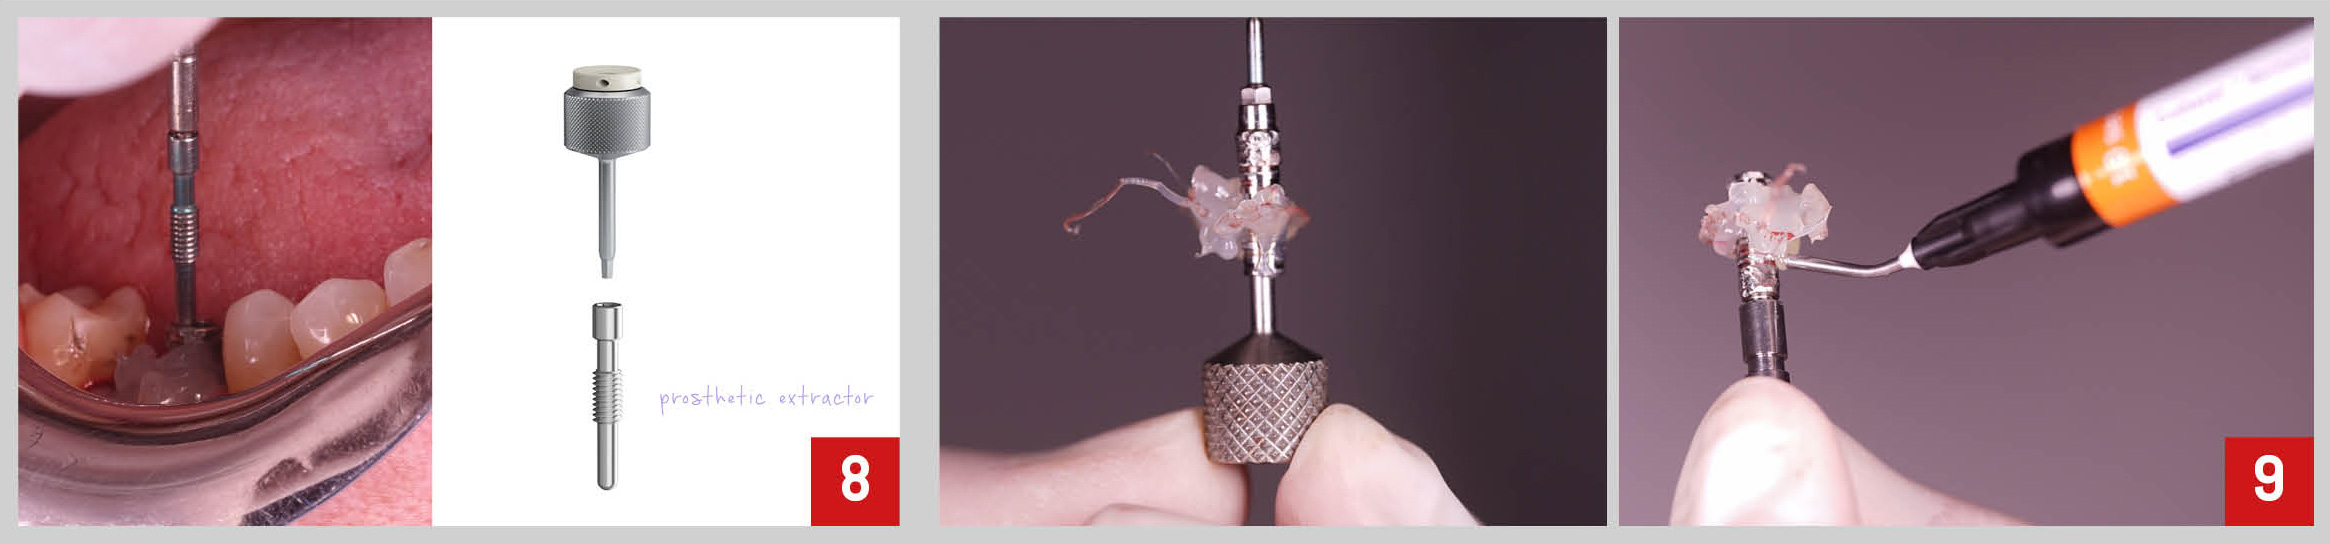
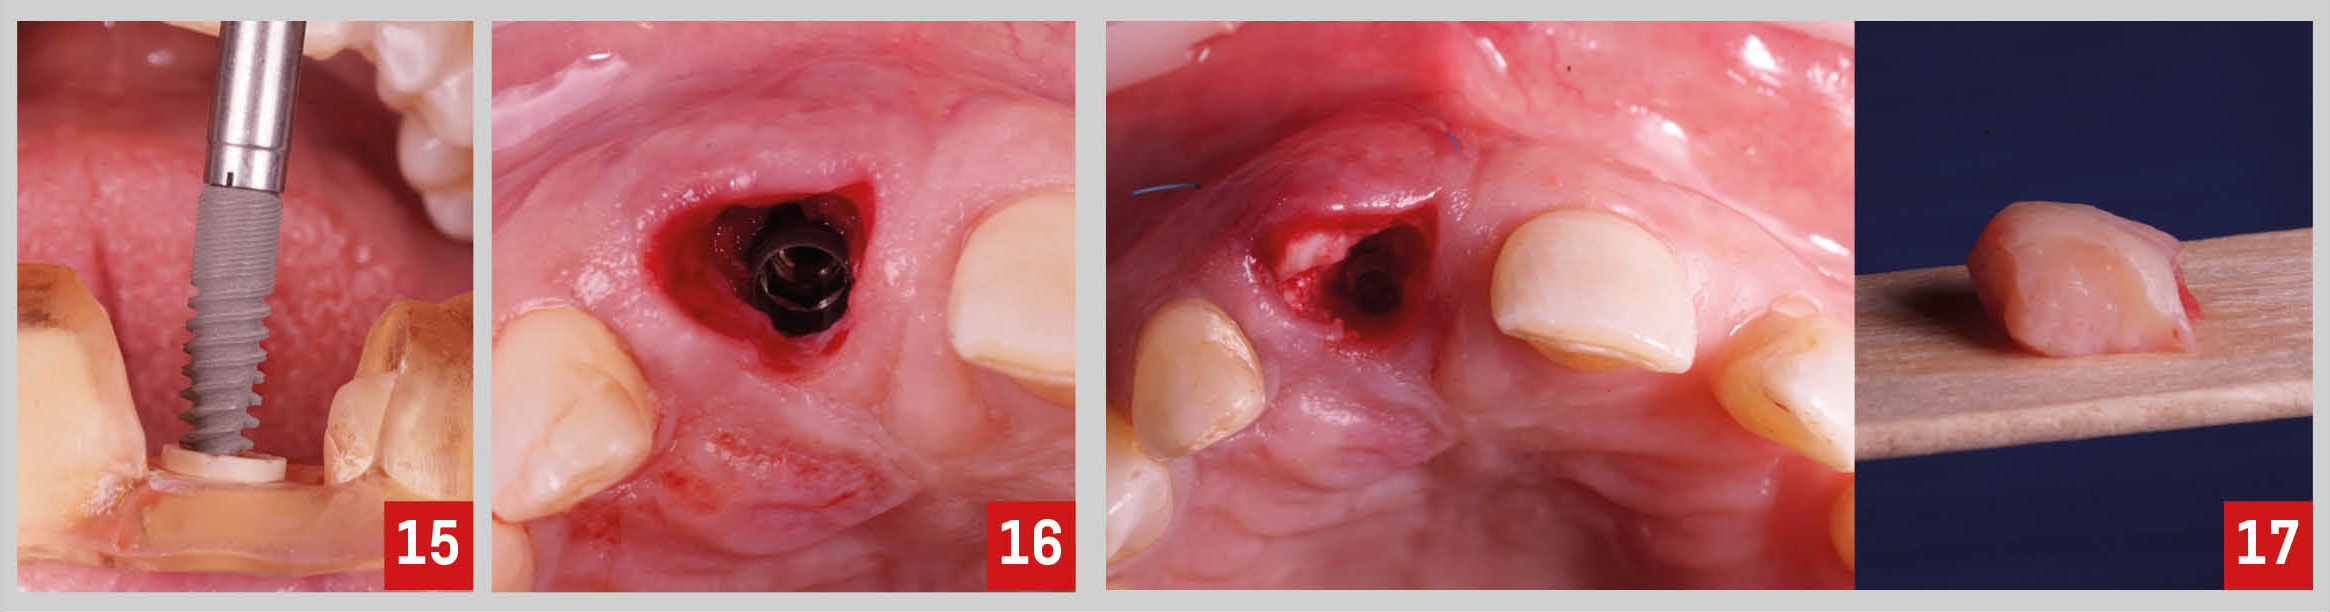
Finally, the socket was filled with a xenograft bone substitute and the custom healing abutment was screwed on the implant. No sutures were necessary as, due to its shape, the abutment itself closed the socket completely (Fig.13-15).


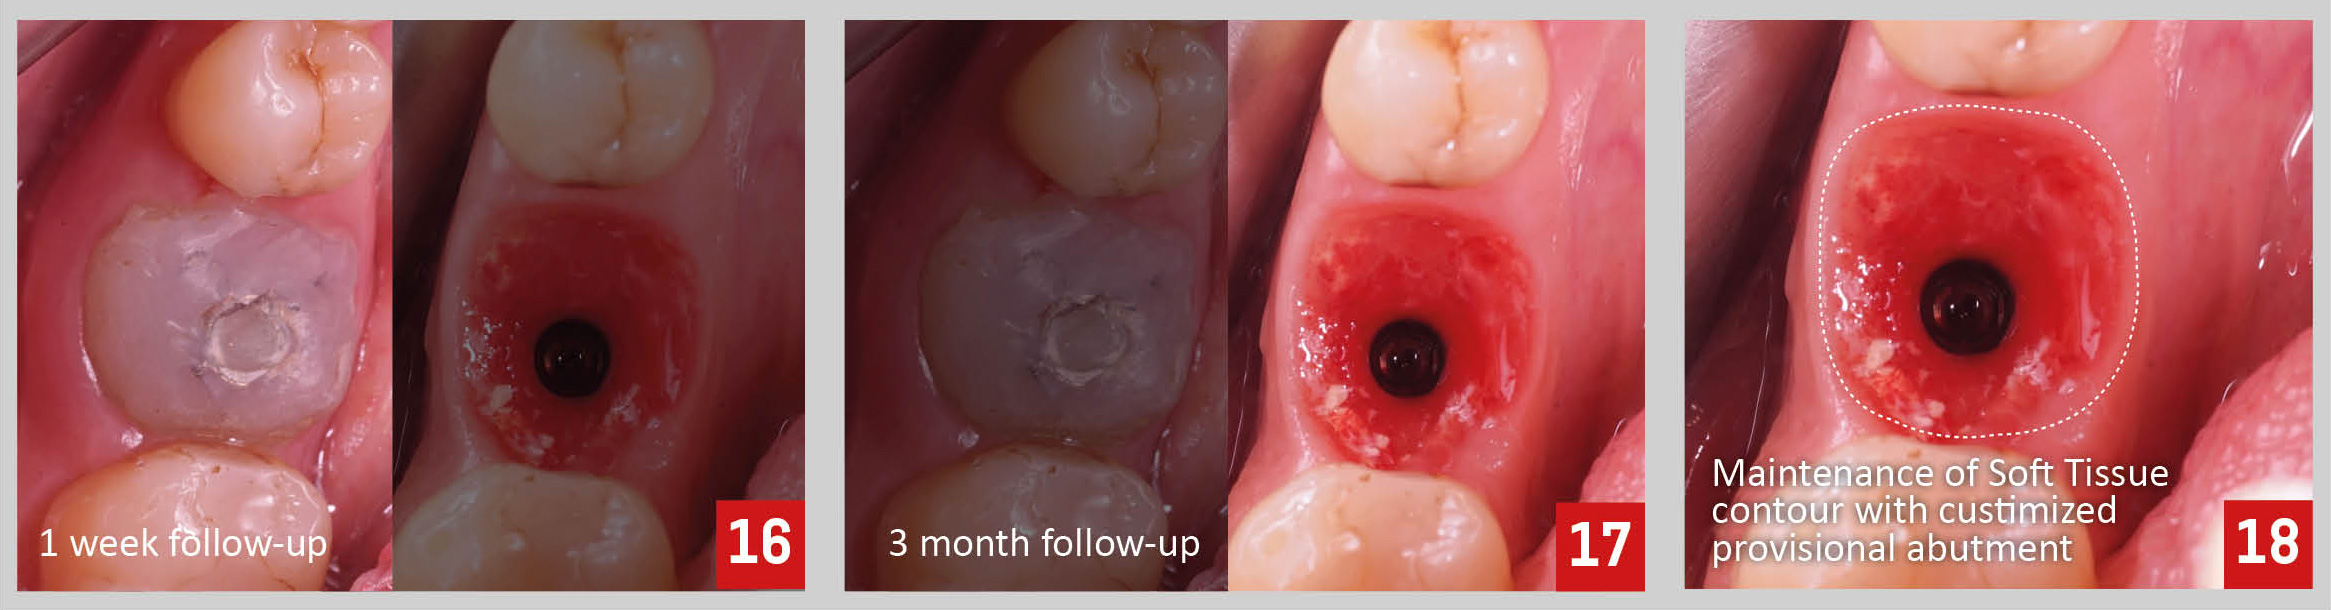
At one week post-operative control appointment we could appreciate a proper healing of the tissues (Fig. 16).

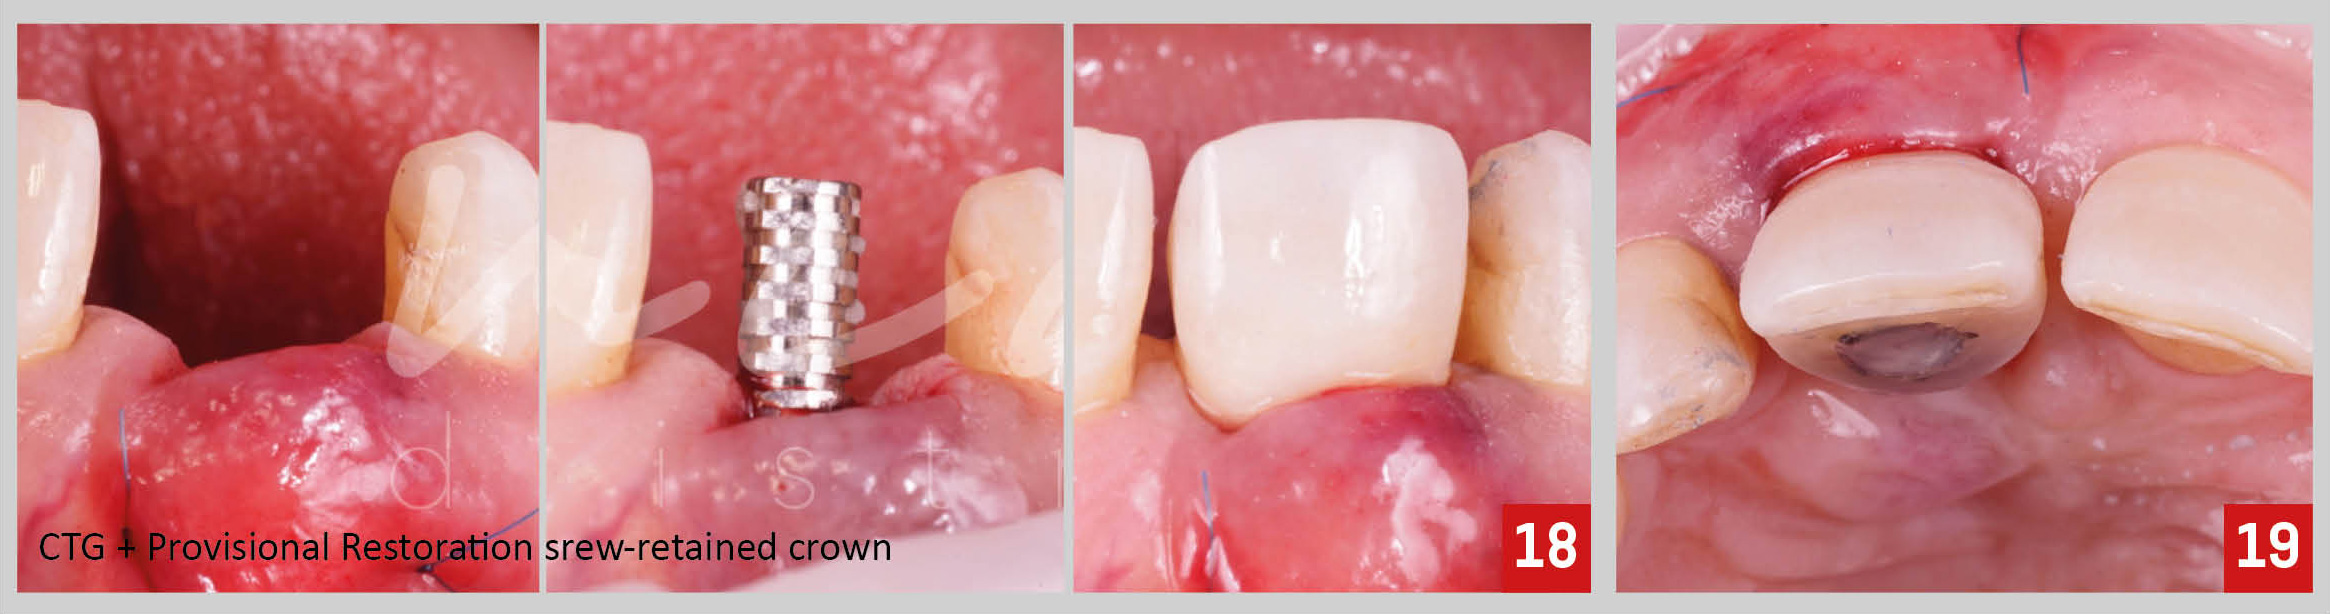
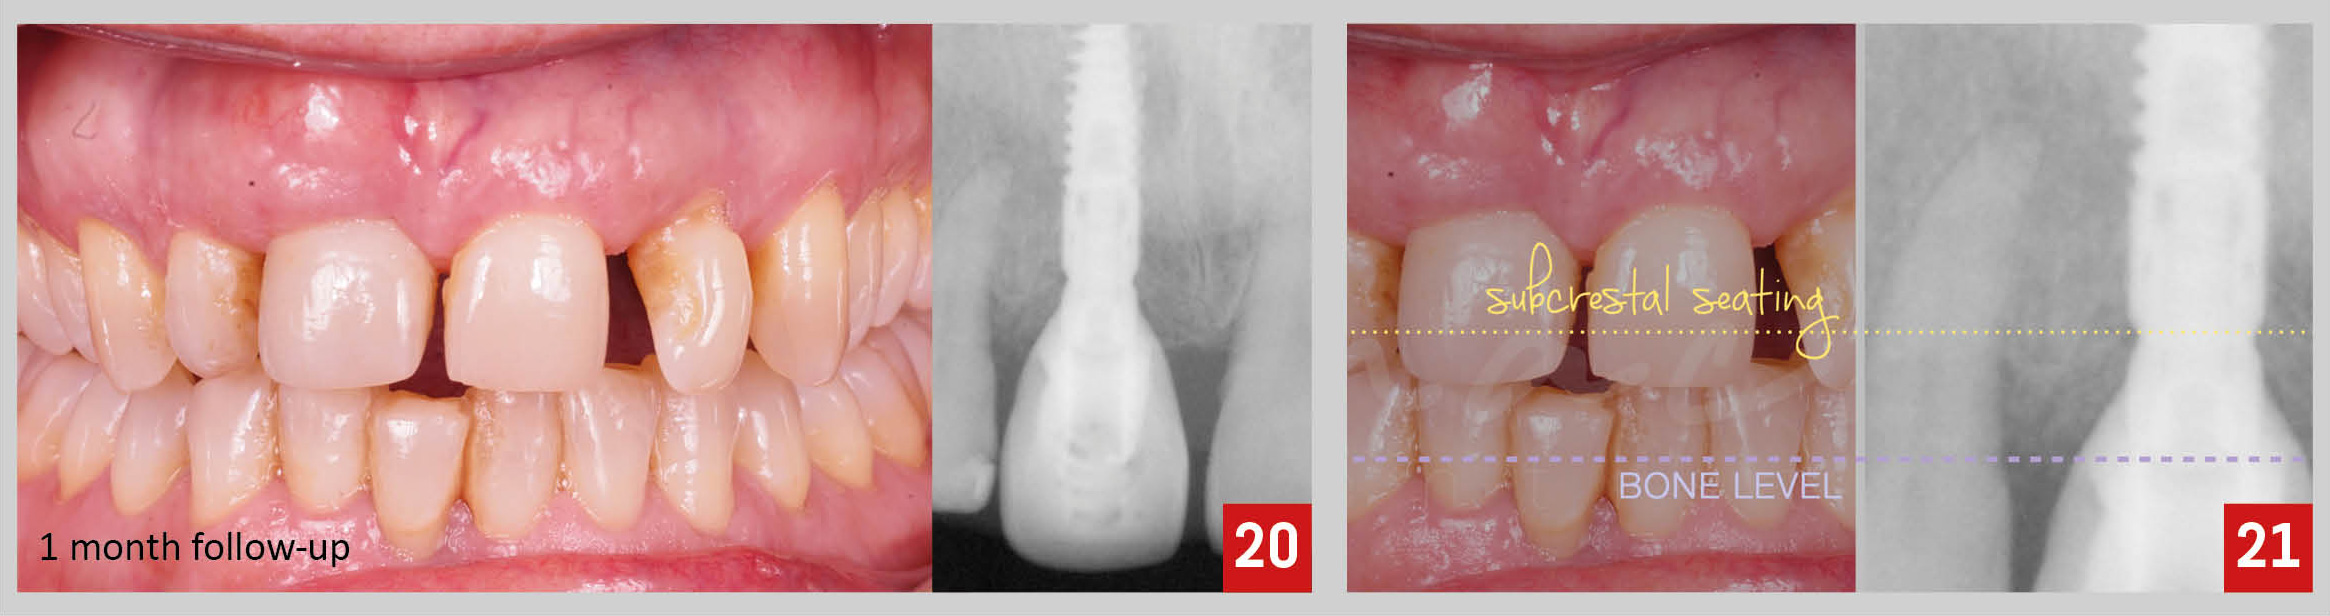
Three months after implant placement, we proceed with the final impressions. After removing the custom healing abutment, we can observe the maintenance of soft tissue contour thanks to the shape of the abutment itself (Fig.17,18).


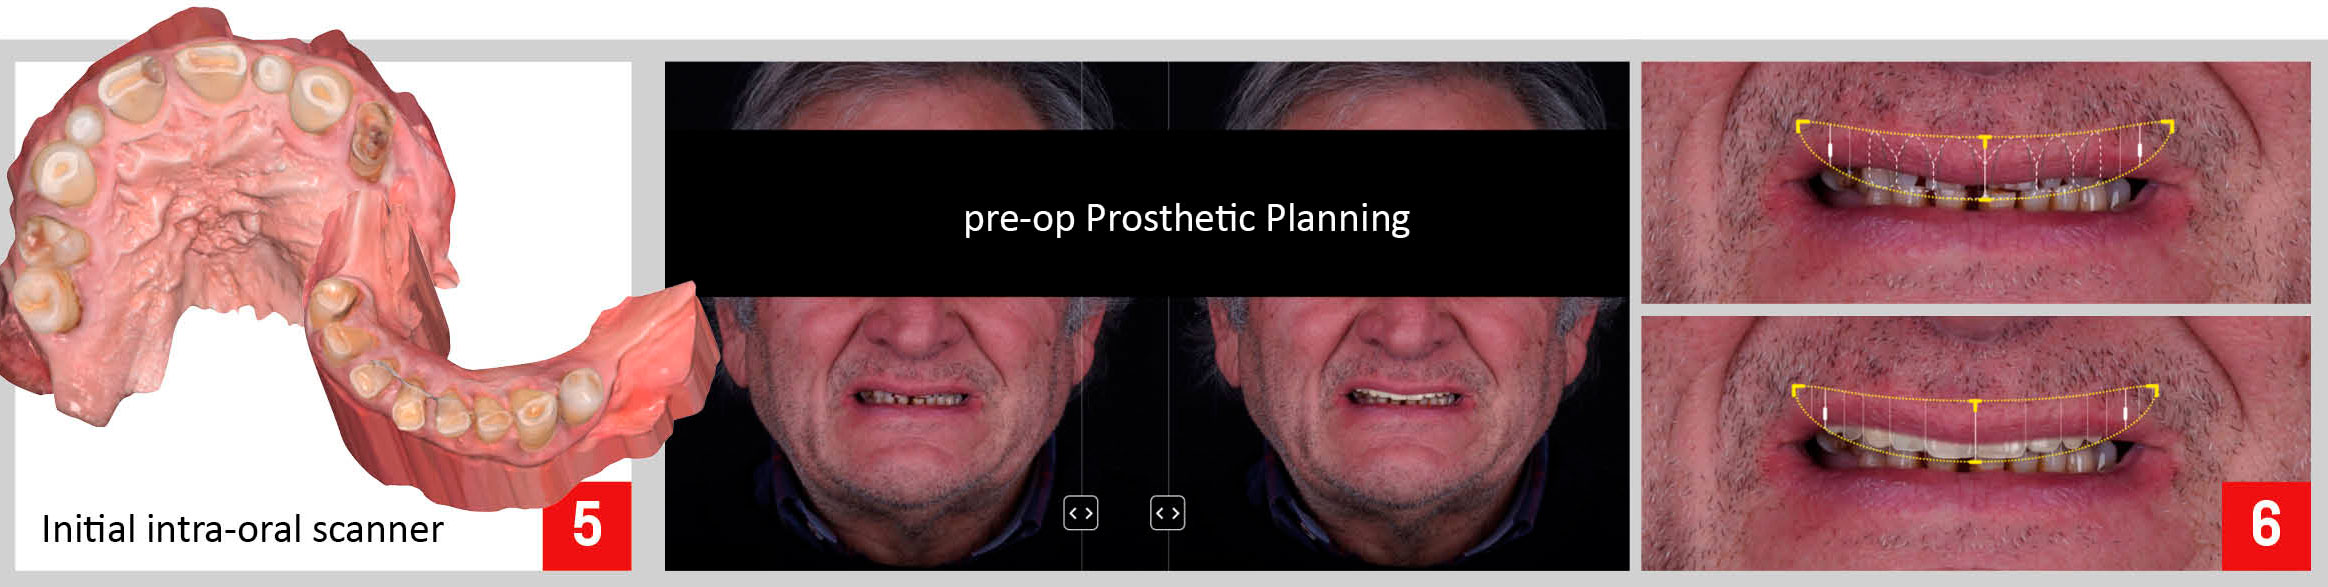
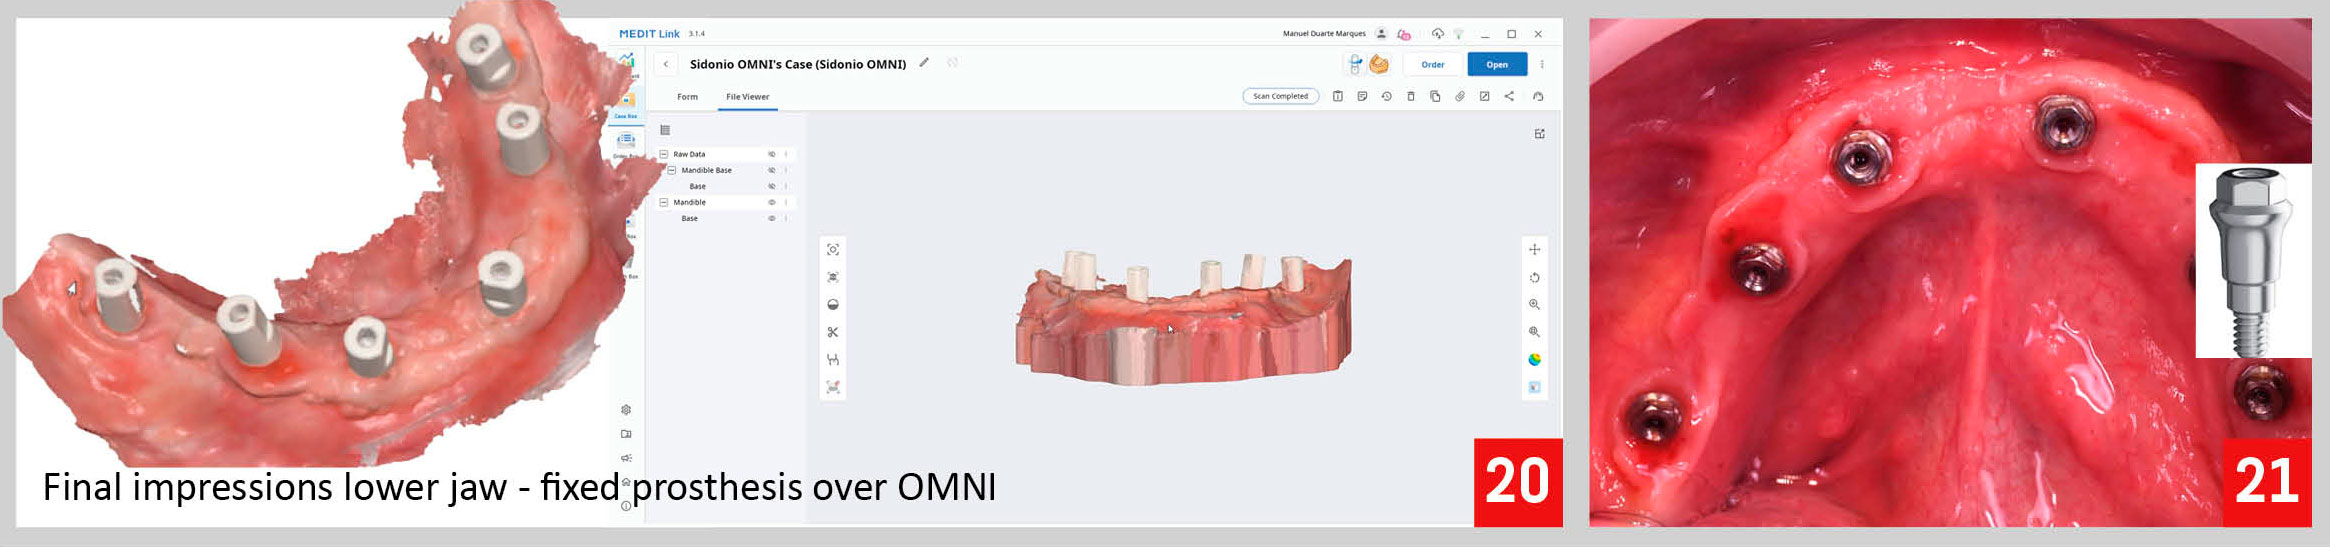
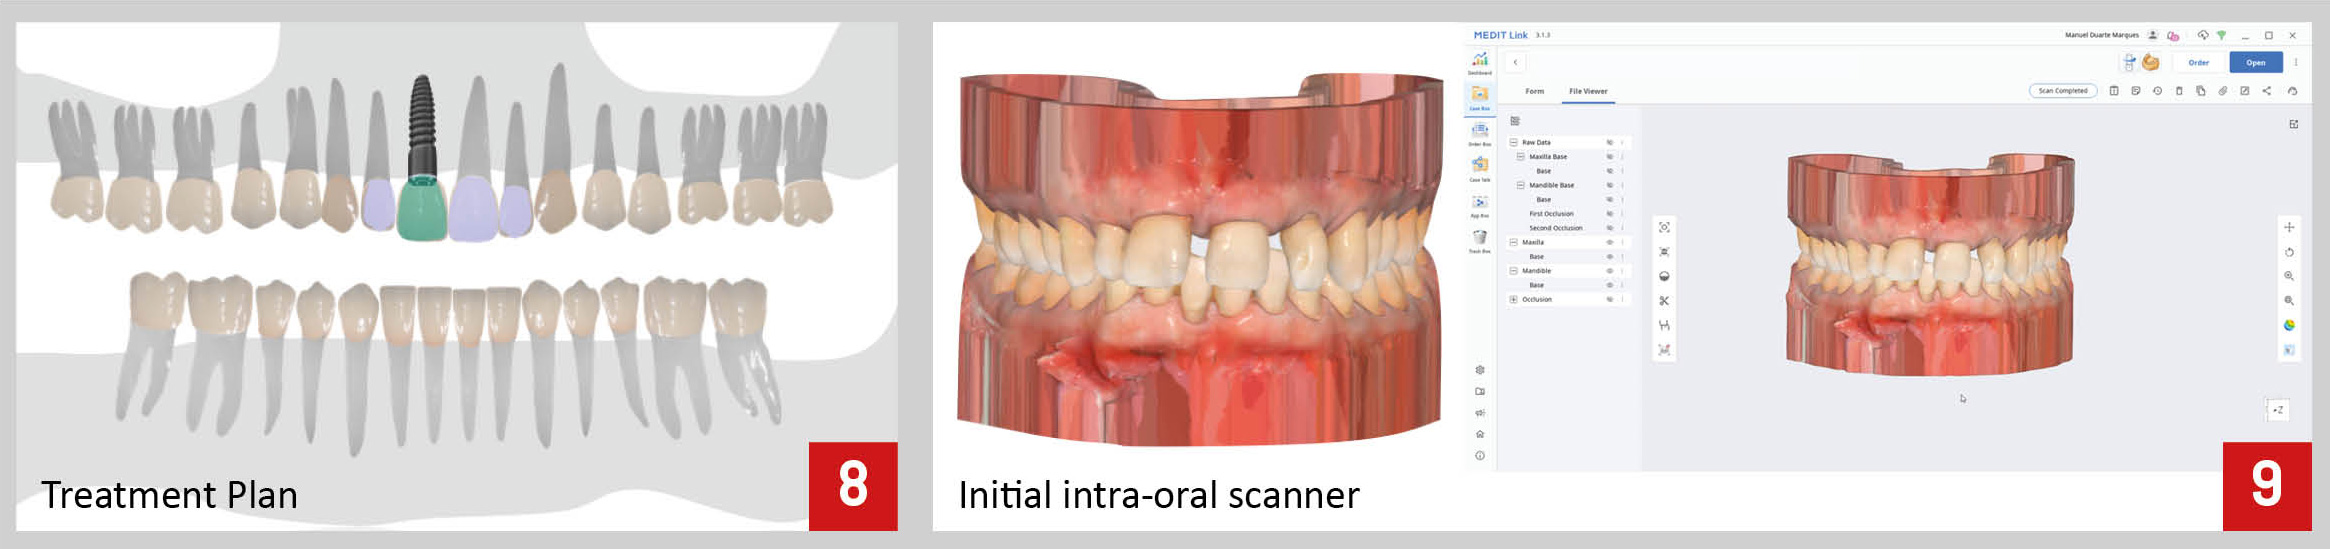
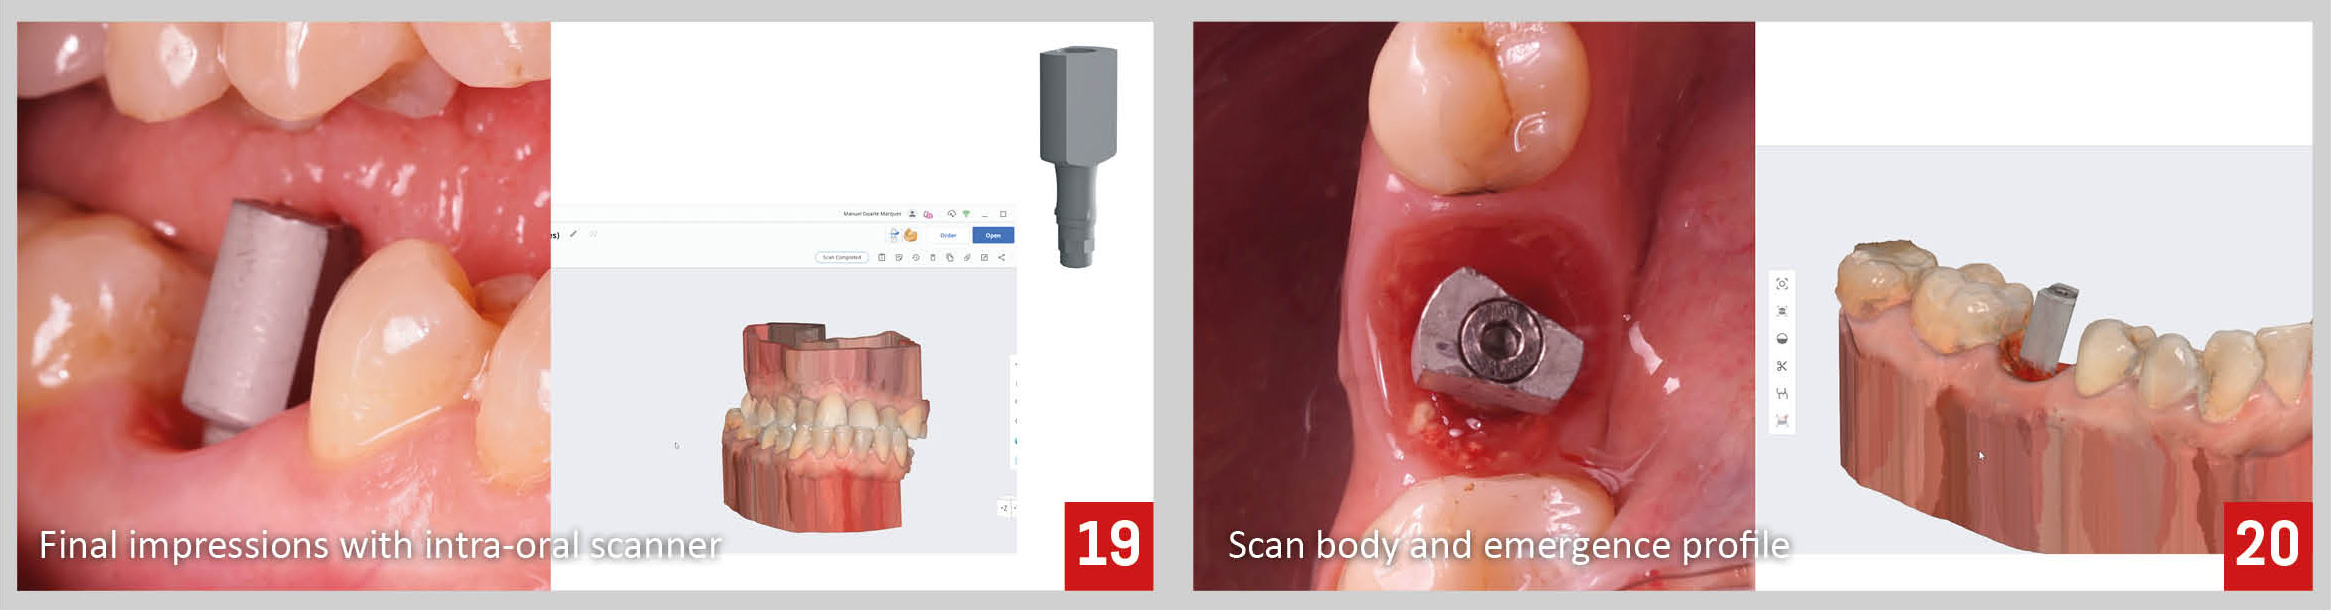
The final impressions were done digitally using an intra-oral scanner. The scanner allow not only the record of the implant position, but also, of the soft tissue anatomy, with great detail (Fig 19,20).


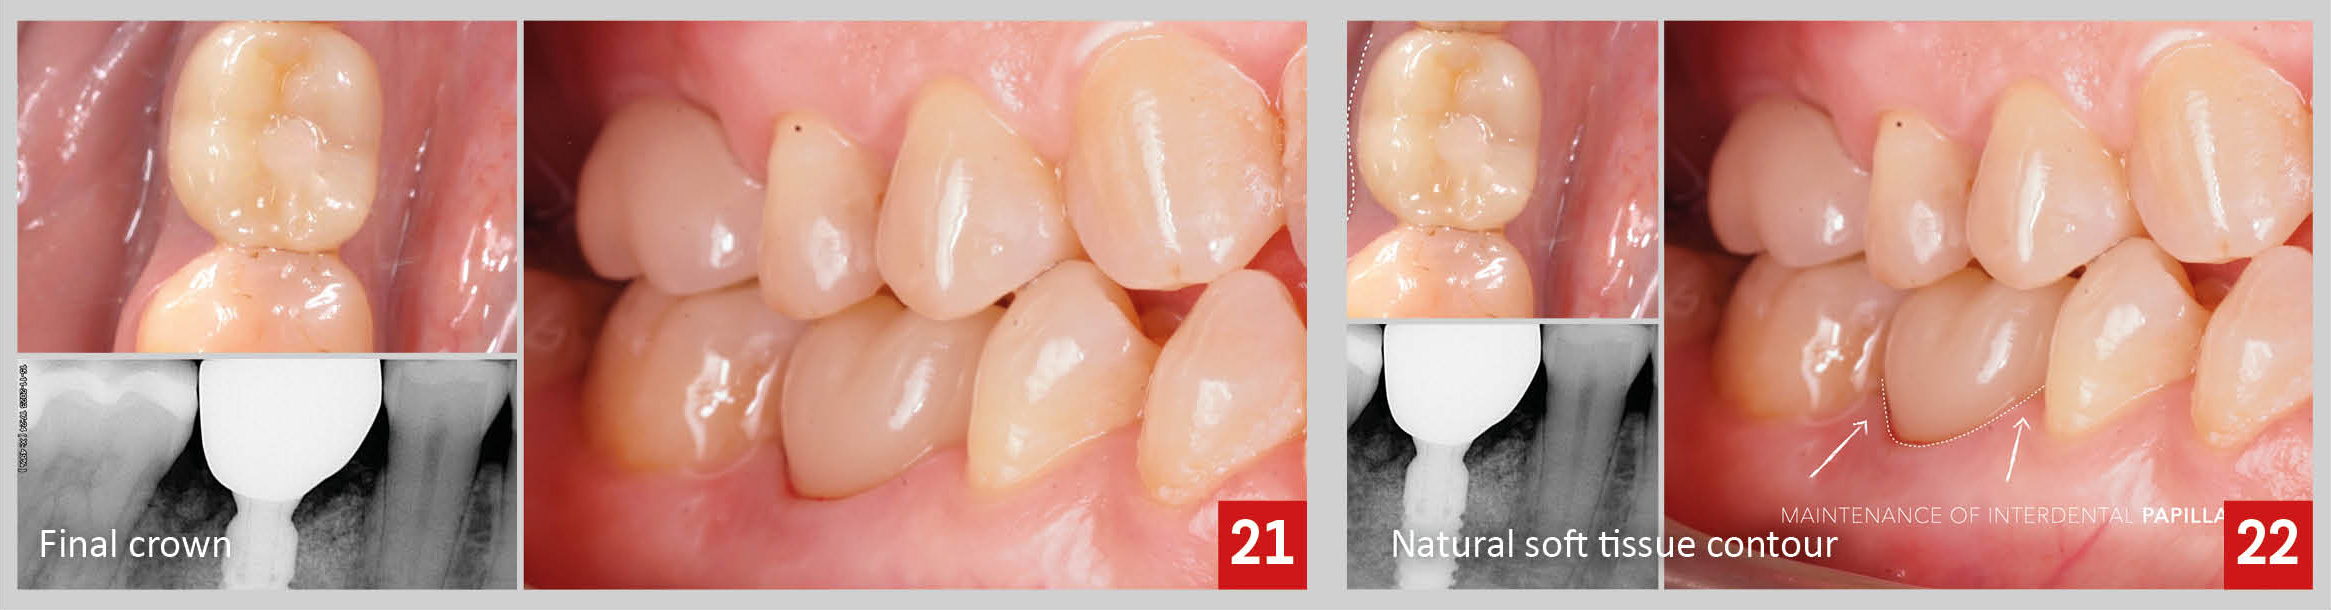
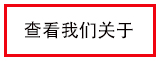
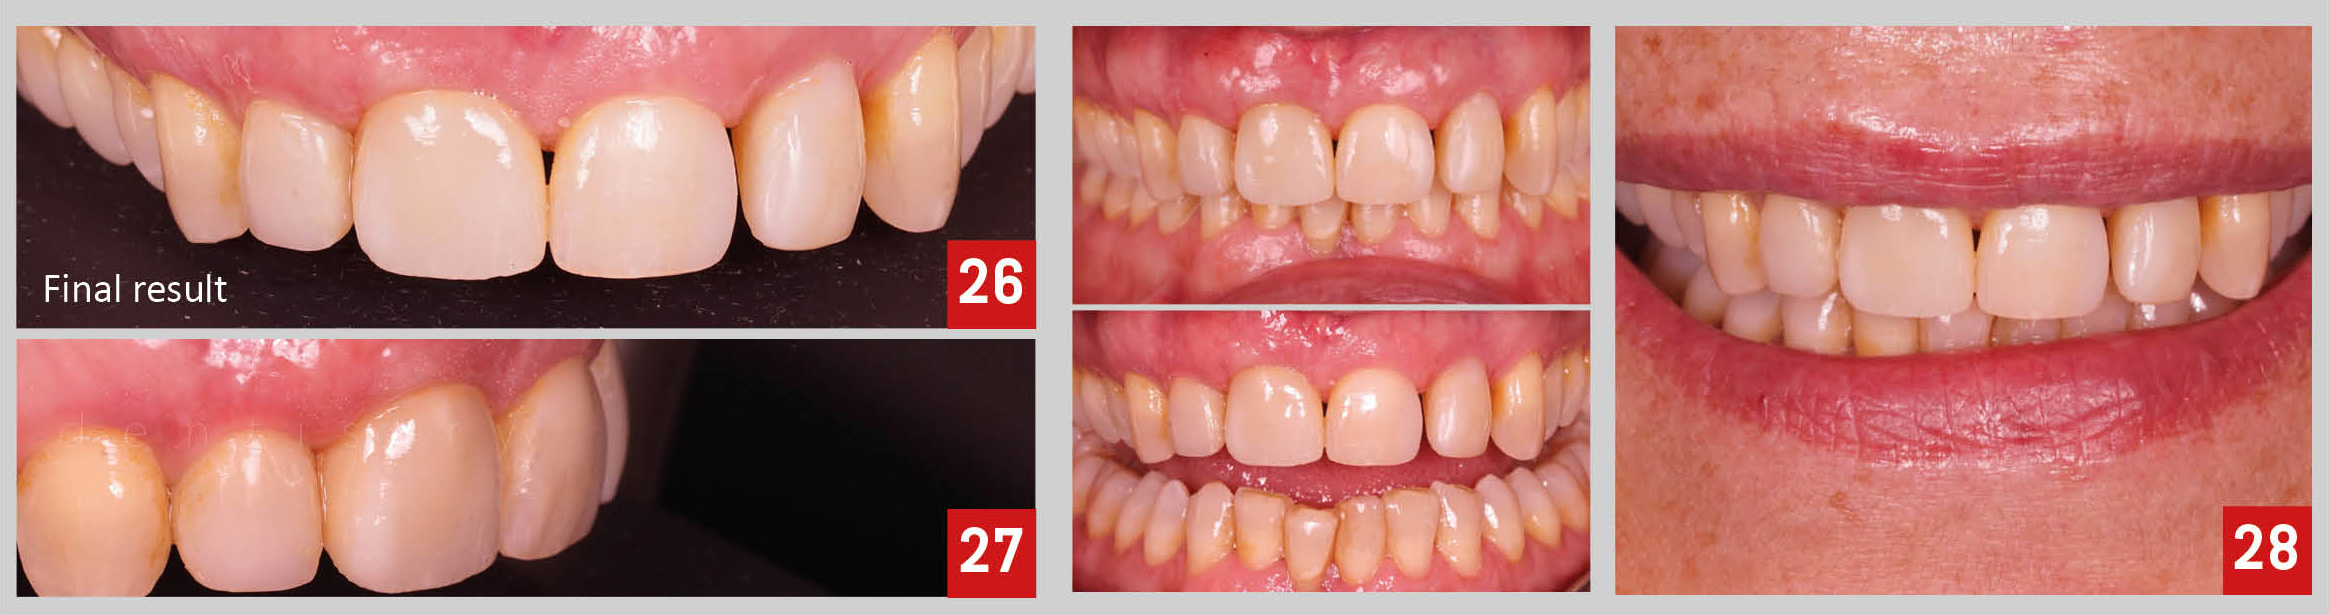
The final crown was fabricated fully digitally in monolithic zirconia. At the time of crown delivery, we could appreciate, in an oclusal view, a proper gingival thickness, and in a lateral view, a very natural soft tissue contour and maintenance of the interdental papilla (Fig. 21,22).

Guided immediate implant placement and immediate loading in the esthetic zone

Written by feRKzzCTo0 on . Posted in Catarina G. Rodrigues, EL – Esthetic Line, GS – Guided Surgery, Manuel D. Marques, 传统种植学, 导引式植牙, 臨床病例

Dr. Catarina G. Rodrigues, DDS, MSc – Dr. Manuel D. Marques, DDS

A 50-year-old woman presented to a private practice very unhappy with the aesthetics of her smile. The patient said that her front teeth were always misaligned, but recently they had worsened considerably. In the initial extra-oral photographs we can note that the right central incisor is excessively inclined towards the buccal side and also extruded (Fig.1,2).

The initial intra-oral pictures revealed wrong tooth proportions and the presence of several spaces between the upper anterior teeth, which obviously compromised the aesthetics of her smile (Fig. 2-5).

The radiographic examination revealed that the bone support of tooth 1.1 was very compromised. Also, clinically we detected grade II mobility (Fig. 6,7).

Following a proper diagnosis and given the fact that the patient asked for a minimal invasive approach, we proposed the following treatment plan: prophylaxis, direct composite restorations on teeth 1.2, 2.1 and 2.2, to help managing the interdental spaces and improve aesthetics, extraction of tooth 1.1 with immediate implant placement and immediate loading, and finally a ceramic crown over implant (Fig.8).

To perform a proper planning of the case, several records of the patient were obtained. Besides intra and extra-oral pictures, we did also full arch IOS impressions and CBCT (Fig. 9).

Since the original position of tooth 1.1 was not correct, this tooth was digitally extracted on the STL file and a 3D wax-up of a new central incisor with correct position, and proportions was digitally made to aid on the planning of the position and dimension of the future implant.

Then – using a specific software to plan the guided surgery – the STL files from the initial scan, the 3D wax-up and the CBCT were all superimposed, allowing the planning of the implant position accordingly to the planned future restoration (Fig.10).

At the time of the surgery, tooth 1.1 was extracted using an atraumatic technique not to damage the bone or the soft tissues (Fig. 11,12).

After that, the stability and adaptation of the guide were checked, followed by guided preparation of the implant site according to a specific drilling protocol and using C-Tech guided surgery kit. (Fig.13,14).

Finally, the implant was inserted through the guide and a connective tissue graft was preformed (Fig. 15-17).

The immediate fixed provisional restoration was made with a titanium provisional abutment and the patient’s own tooth. The root of the extracted tooth was cut and prepared to be bonded to the titanium abutment. Then, the provisional crown was finished and polished (Fig. 18,19).

The 1-month follow-up appointment revealed very good healing and adequate aesthetics of the interim prosthesis. Also, on the periapical x-ray we can note the subcrestal position of the implant, ideal for the aesthetic zone once it allows proper emergence profile of the implant restoration and helps with long-term aesthetic stability (Fig. 20,21).

While we waited for the osseointegration of the implant, we proceeded with the direct composite restorations of teeth 1.2, 2.1 and 2.2. We selected the shade of the composite resin and then completed the direct restorations under rubber dam (Fig. 22-24).

Later, 3 months after the implant surgery, we proceeded with the final impressions. To help the lab technician with the reproduction of the critical and subcritical contour of the provisional crown, I scanned first the provisional on the mouth and then the provisional crown alone (Fig 25).

Finally we delivered the final restoration, a screw-retained layered zirconia crown over implant (Fig. 26-28).

When comparing the initial situation of the patient and her final pictures, we can appreciate an important improvement on the aesthetics of her smile (Fig. 29-31).

病例报告表

Written by feRKzzCTo0 on . Posted in EL – Esthetic Line, Peng Dong, 传统种植学, 臨床病例

Doctor Peng Dong, the expert of tooth implantation in Peking University International Hospital and president of Beijing Hedu Stomatological Clinic Co., Ltd

Medical Case Report

性别/年龄: 女/74岁  
初诊: 2014.7.14 植牙: 2014.10.30
辅助措施: 最终修复: 2015.6.19
第1次复诊: 2015.1.17  
患者主诉: 右上后牙缺失,要求种植修复。
特殊事项:

病例概要

右上第一磨牙缺失多年,植入C-Tech种植体,型号为:EL-4311植。后期氧化锆全冠修复。

治疗计划

右上6牙槽骨宽度为8.65mm,骨高度为15.28mm,植入C-Tech种植体EL-4311,常规植入。

治疗内容

1、常规消毒铺巾。右上6局部浸润麻醉。
2、右上6、7 牙槽嵴顶近远中水平切口,右上7颊侧减张切口,翻瓣,去除右上6近中骨突,降低骨高度1.5mm。
3、右上6定点,先锋钻达工作长度,扩孔钻逐级备洞至3.8*13mm,植入C-Tech种植体EL-4311+封闭螺丝,扭力5N,
右上7嵴顶取骨块置于右上6腭侧,严密缝合。
4、8个月后取模,更换修复基台,型号为EL-4503F,粘接固定,氧化锆全冠永久修复。

病例报告表

Written by feRKzzCTo0 on . Posted in EL – Esthetic Line, Peng Dong, 传统种植学, 臨床病例, 骨再生

Doctor Peng Dong, the expert of tooth implantation in Peking University International Hospital and president of Beijing Hedu Stomatological Clinic Co., Ltd

Medical Case Report

性别/年龄: 女/55岁  
初诊: 2014.1.16 植牙: 2014.2.21
辅助措施: 2014.2.21 最终修复: 2014.9.13
第1次复诊: 2014.1.16  
患者主诉: 上前牙缺失,要求种植修复。
特殊事项: 即刻种植+GBR

病例概要

左上1桩冠松动,拔除后,即刻植入C-Tech种植体,型号为:EL-4311,后期氧化锆烤瓷冠修复。

治疗计划

左上1颊舌径为9.17mm,骨高度为13.5mm,拔除后即刻植入C-Tech种植体EL-4311,常规植入同期植骨,活动义齿修复。

治疗内容

1、取静脉血20ml 制作CGF备用。
2、常规消毒铺巾,微痛局麻术区,沿左上1沟内切口,微创拔除患牙,根完整,彻底搔刮清创。
3、左上1定点,先锋钻达工作长度,扩孔钻逐级备洞至3.7*13mm (近中), 植入C-Tech植体 EL-4311 +封闭螺丝, 扭力45N,骨粉Bio-Oss置于唇侧骨缺失处, 盖Bio -Gide膜,减张缝合,关闭创口。
4、六个月后取模,更换修复基台,型号为EL-4503F,粘接固定,氧化锆烤瓷冠永久修复。

病例报告表

Written by feRKzzCTo0 on . Posted in EL – Esthetic Line, Peng Dong, 传统种植学, 臨床病例, 骨再生

Doctor Peng Dong, the expert of tooth implantation in Peking University International Hospital and president of Beijing Hedu Stomatological Clinic Co., Ltd

Medical Case Report

性别/年龄: 男/76岁  
初诊: 2015.5.7 植牙: 2015.9.18
辅助措施:2015.9.18 最终修复: 2016.3.5
第1次复诊: 2016.3.24  
患者主诉: 下颌前牙缺失,要求种植修复。
特殊事项:GBR

病例概要

下颌2、1、1、2因松动拔除三个月,身体健康,未见其他手术禁忌症。口腔检查:下颌2-2缺失,牙槽骨吸收明显,粘膜无红肿;左下3、右下3及上颌2-2无龋齿,不松,牙龈无红肿;上下前牙为深覆颌Ⅱ度;全口卫生状况良好(牙周刮治后一周),结石(-),色素(-),软垢(-),牙龈退缩明显。CT显示:右下2牙槽骨宽度为5.0mm,骨高度为15.2mm;左下2牙槽骨宽度为4.5mm,骨高度为15.8mm。

治疗计划

左右下2常规植入C-Tech植体ND-3009二颗,同期简单植骨;五个月后取模氧化锆烤瓷桥永久修复。

治疗内容

1、术前取血制作CGF备用;
2、常规心电监护下消毒铺巾,左右下4区域无痛局部浸润麻醉,沿牙槽嵴顶近远中水平切口+左右下3沟内切口,分龈翻瓣,见牙槽骨吸收明显,大球钻平整骨面;
3、左右下2定点,先锋钻达工作长度,扩孔钻逐级备洞达2.6*13.0mm,植入C-Tech植体ND-3009*2+封闭螺丝,扭力均为20N,于左右下2颊侧植入骨粉Bio-Oss+骨膜Bio-Gide+CGF膜,严密缝合,咬无菌纱布卷止血。嘱术后注意事项,口服抗生素5天,4次/日氯己定漱口水漱口两周。
4、10天后拆线,创口愈合良好,缝合线存,软垢(+),软组织稍红肿。
5、5个月后取模,置换修复基台,型号为ND-3025-2*2,氧化锆烤瓷冠桥粘接固定,永久修复。

结论

1、患者对当前的牙齿状况感到满意,义齿在功能和外观方面都很好。
2、种植后无疼痛,无感觉异常,无感染或损害发生。
3、临床观察期间未见牙龈萎缩。
4、X线片所见:观察期间左下2、右下2植体颈部的骨吸收均小于0.2mm。

病例报告表

Written by feRKzzCTo0 on . Posted in EL – Esthetic Line, Peng Dong, 传统种植学, 臨床病例, 骨再生

Doctor Peng Dong, the expert of tooth implantation in Peking University International Hospital and president of Beijing Hedu Stomatological Clinic Co., Ltd

Medical Case Report

性别/年龄: 男/ 47岁  
初诊: 02/07/2015 植牙: 08/08/2015 / 18/09
辅助措施:08/08/2015 / 18/09 最终修复: 18/06/2016
第1次复诊: 29/06/2016  
患者主诉: 上颌牙松动严重,要求治疗。
特殊事项:即刻种植+即刻负重+GBR

病例概要

上颌:右上8、2和左上1、2、8Ⅱ~Ⅲ°松动,右上5、4、3和左上3、4、5不同程度牙龈萎缩,Ⅰ~Ⅱ°松动。同时拔除后,即刻植入C-Tech种植体,型号为:EL-3511/EL-4311/EL5111,共8颗。
下颌:右下3、4、5和左下4、5不同程度牙龈萎缩,Ⅰ~Ⅱ°松动,同时拔除后,即刻植入C-Tech种植体,型号为:EL-4311/EL5109/EL5111,共6颗。
后期氧化锆全冠桥修复。

治疗计划

上颌2、3、5、6牙槽骨宽度和骨高度理想,拔除患牙后,即刻植入C-Tech种植体EL-3511/EL-4311/EL-5111,共8颗,植体支持固定临时义齿修复。
一个月后种植下颌
下颌3、4、6牙槽骨宽度和骨高度理想,拔除患牙后,即刻植入C-Tech种植体EL-4311/EL5109/EL5111,共6颗,植体支持固定临时义齿修复。

治疗内容

上颌种植手术

1、常规消毒铺巾。微痛局部浸润麻醉上颌全牙列。暂时保留右上8。

2、左上7至右上7沿牙槽嵴顶切口,右上5、4、3、2和左上3、4、5沟内切口,翻瓣。拔除患牙。骨钳去除牙槽间隔,大球钻平整骨面。

3、左右上6定点,级差备洞至4.7*13,均植入C-Tech种植体5.1*11mm,左上6扭力不足。右上5、3、2和左上2、3、5定点,级差备洞,左右上2至2.8*13mm,均植入C-Tech种植体EL-3511。级差备洞,左右上3、5至3.7*13mm,均植入C-Tech
种植体EL-4311。利用右上6 5 3 2和左上2 3 5 植体,安装peek临时基台,左上6+封闭螺丝,骨粉Bio-Oss覆盖左上6牙槽嵴顶及右上3~4骨间隙,盖骨膜Bio-Gide。严密缝合。

4、利用上颌总义齿及右上6 5 3 2和左上2 3 5 植体制作临时义齿。调颌。

下颌种植手术

左1、常规消毒铺巾。无痛推麻仪局部浸润麻醉下颌全牙列。

2、左下7~右下7牙槽嵴顶近远中水平切口,右下5、4、3和左下4、5沟内切口,分龈翻瓣,拔除患牙,咬骨钳去除薄锐牙槽嵴顶边缘,球钻平整股骨面。

3、左下6定点,先锋钻达工作长度,扩孔钻逐级备洞至4.7*12mm,植入C-Tech种植体EL-5111+peek基台Φ4.5H3,扭力60N,边缘骨高度M1D1B0.5L0.5。右下3、4和左下3、4,级差备洞3.7*13mm,植入C-Tech种植体EL-4311, 左下4+封闭螺丝,扭力20N,边缘骨高度M2D2B1L2。左下3+peek基台Φ4.5H3,扭力60N,边缘骨高度M0.5D0.5B0.5L0.5。右下3+peek基台Φ4.5H3,扭力60N,边缘骨高度M1.5D1.5B0.5L1。
右下4+封闭螺丝,扭力20N,边缘骨高度M1.5D1.5B1L1.5。右下6定点,级差备洞至4.7*11mm,植入C-Tech种植体EL-5109+peek基台Φ4.5H3,扭力为:60N,边缘骨高度M-0.5D-1B0L-0.5。左下3、4和右下4、6 植入骨粉Bio-Oss,+骨膜Bio-Gide,严密缝合,压迫止血。

4、利用 右下3、6和左下3、6做基台,行下颌即刻过度义齿。调颌。

5、十个月后取模,更换修复基台,粘接固定,氧化锆烤瓷冠永久修复。

病例报告表

Written by feRKzzCTo0 on . Posted in EL – Esthetic Line, Peng Dong, 传统种植学, 臨床病例

Doctor Peng Dong, the expert of tooth implantation in Peking University International Hospital and president of Beijing Hedu Stomatological Clinic Co., Ltd

Medical Case Report

性别/年龄: 女/74岁  
初诊: 14/07/2014 植牙: 15/01/2015
辅助措施: 最终修复: 19/06/2015
第1次复诊: 17/01/2015  
患者主诉: 左下后牙缺失,要求种植修复。
特殊事项:

病例概要

左下后牙缺失多年,植入C-Tech种植体,型号为:EL-4307,二颗,后期氧化锆全冠修复。

治疗计划

左下6牙槽骨宽度为6.8mm,骨高度为10.2mm,植入C-Tech种植体EL-4307;左下7牙槽骨宽度为6.2mm,骨高度为9.8mm,植入C-Tech种植体EL-4307,常规植入。

治疗内容

1、常规消毒铺巾,左下567局部浸润麻醉。
2、左下6、7 沿牙槽嵴顶切口,左下5沟内切口,左下7颊侧远中减张纵斜切口,翻瓣,平整骨面。
3、左下6、7定点,先锋钻达工作长度,级差备洞至3.9*9mm 收集自体骨,植入C-Tech种植体EL-4307+封闭螺丝,左下6扭力60N ,边缘骨高度M3/D1.5/B1/L1;左下7扭力60N, 边缘骨高度M1.5/D1/B1/L0。自体骨置于左下67种植体颊侧、颈部,严密缝合,止血。
4、5个月后取模,更换修复基台,型号为EL-4502F/2,氧化锆全冠修复,粘接固定,永久修复。
.

病例报告表

Written by feRKzzCTo0 on . Posted in EL – Esthetic Line, ND – Narrow Diameter, Peng Dong, 传统种植学, 臨床病例

Doctor Peng Dong, the expert of tooth implantation in Peking University International Hospital and president of Beijing Hedu Stomatological Clinic Co., Ltd

案例编号

性别/年龄: 女/36岁  
初诊: 2014.11.8 植牙: 2015.7.8
辅助措施: 2014.12.17 最终修复: 2016.3.19
第1次复诊: 2016.3.26  
患者主诉: M左上前牙缺失,要求种植修复。
特殊事项: on-lay植骨

病例概要

左上1、2因外伤拔除三个月,身体健康,未见其他手术禁忌症。口腔检查:左上1、2缺失,牙槽骨吸收明显,粘膜无红肿;右上1、左上3及下颌2-2无龋齿,不松,牙龈无红肿;上下前牙关系为深覆颌Ⅰ度;全口卫生状况良好,结石(-),色素(-),软垢(-),牙龈色粉质韧,探诊无出血。CT显示:左上1骨宽度为3.6mm,骨高度为15.6mm;左上2宽度为1.5mm,骨高度为14.5mm,缺隙13mm。

治疗计划

前期取右下8颊侧骨板1.5cm*1.0cm,移植到左上1、2处行on-lay植骨;六个月后常规植入C-Tech种植体,型号为:EL-3509/ND-3011各1颗;三个月后制作临时修复体;五个月后取模氧化锆烤瓷冠永久修复。

治疗内容

1、常规心电监护下消毒铺巾,右上3至左上4无痛局浸麻醉。
2、沿左上1~2近远中水平切口,左上3颊侧远中减张切口,翻瓣,见骨质愈合良好,取固位钉。
3、左上1、2定点 ,左上1级差备洞至3.0mm,植入C-Tech种植体EL-3509+封闭螺丝,扭力为25N;左上2 级差备洞至2.6mm,植入C-Tech种植体ND-3011 +封闭螺丝,扭力为20N,严密缝合,咬无菌纱布卷止血。嘱术后注意事项,口服抗生素3天,4次/日氯己定漱口水漱口两周。
4、10天后拆线,创口愈合良好,缝合线存,软垢(-),软组织无红肿。
5、8个月后取模,更换修复基台,型号为EL-4502F/ND-3025-2,粘接固定,氧化锆烤瓷冠永久修复。

结论

1、患者对当前的牙齿状况感到满意,义齿在功能和外观方面都很好。
2、种植后无疼痛,无感觉异常,无感染或损害发生。
3、临床观察期间未见牙龈萎缩。
4、X线片所见:观察期间左上1、2植体颈部的骨吸收均小于0.2mm。

Prefooter CN