info@c-tech-implant.com +39 051 66 61 817 + 49 721 60 95 32 38

    • Italiano
    • English
    • Deutsch
    • Español
    • Français
    • Русский
    • 中文 (中国)
    • Türkçe
    • Ελληνικά
    • Magyar
    • Српски језик
    • Lietuviškai
    • Bahasa Indonesia
    • Slovenčina

Slide Mission, Internazionale, Garanzia, Certificazione, prodotti Compatibili

Clinical cases

2 single implants restoration, 7-year follow-up

Written by feRKzzCTo0 on . Posted in Clinical cases, Conventional Implantology, EL – Esthetic Line, Peng Dong

Doctor Peng Dong, the expert of tooth implantation in Peking University International Hospital and president of Beijing Hedu Stomatological Clinic Co., Ltd

Medical Case Report

Sex / Age: Female/74  
First Visit: 14/07/2014 Implant Surgery: 30/10/2014
Others Surgery (GBR…): Final Restoration: 19/06/2015
First Recall: 19/06/2015  
Chief Complaint: Missing an upper posterior tooth, the patient seeks implant restoration.
Consideration(s):

CASE OUTLINE

The upper right first molar has been missing for several years. It will undergo restoration using a C-Tech implant (Model: EL-4311). A subsequent application of an oxidized zirconia full crown is planned.

TREATMENT PLAN

The width of the alveolar bone in the region of the upper right tooth 6 measures 8.65mm, with a bone height of 15.28mm. The C-Tech implant (EL-4311) will be conventionally placed.

TREATMENT

1、Perform standard disinfection and drape the area with cloths. Administer local anesthesia to the region of the upper right tooth 6.
2、Make horizontal incisions along the crest of the alveolar ridge of both the upper right tooth 6 to tooth 7. Create a buccal flap reflection on the upper right seventh tooth region. Remove the bone prominence near the upper right tooth 6, reducing the bone height by 1.5mm.
3、Precisely position the C-Tech implant (Model: EL-4311) in the location of the upper right tooth 6. Use pilot drills to reach the working length and gradually prepare the borehole to 3.8*13mm. Implant the C-Tech implant (EL-4311) with a closure screw, applying a torque of 5N.
Take a bone block from the alveolar ridge of the upper right tooth 7 and place it on the palatal side of the upper right sixth tooth. Securely suture the area.
After 4 to 8 months, take an impression and replace the restorative abutment with Model: EL-4503F. Permanently fix it with adhesive fixation, and apply an oxidized zirconia full crown for long-lasting restoration.

Rehabilitation of atrophic maxilla combining GBR and dental implants

Written by feRKzzCTo0 on . Posted in Bone Regeneration, Clinical cases, Conventional Implantology, EL – Esthetic Line, OMNI

Dr. Santiago Fernández Sánchez (Dentist: surgical and restorative procedure) Technician: Simón Lamela

The patient, a male 64 years old, no significant medical condition or smoker; had a long term complete edentulous condition on the upper jaw, more than 15 years (fig. 1 & 2).

In this time, he visited several professionals without finding any solution other than removal prosthesis due to the extreme resorption of his remanent bone. After exploring the case in addition to CBCT and Rx (fig. 3.1 & 3.2) we considered to offering the patient the following solution: fixed restoration supported by 8 implants, placed after a GBR procedure.
We considered the no smoking condition crucial for the success of the regenerative procedure, due to the limited osteogenic surface we had at our disposal.

For this case we used freeze-dried human bone offered by a local tissue bank. A three-cortical iliac crest piece was selected, big enough to cover both sides of the maxilla. During the surgery, a wide flap was raised in order to uncover the entire remaining bone (fig. 4).
After that, all the cancellous bone was cleared out from the graft so it could be filled with a mix of autologous bone and freeze-dried allograft in a 50/50 proportion (fig. 5).

Patients bone was collected by scratching from the same surgical area, specially from pyramidal apophysis of the zygoma. The mixture was soaked in PRF, improving the angiogenesis inside the graft once placed in site. Both grafts were fixed using screws (fig. 6) and covered with collagen membrane intended to work as a barrier against soft tissue for at least 16 weeks (fig. 7 & 8).
Implant surgery took place after 16 weeks of healing time: 8 C-Tech EL implants were placed after removing the screws that remained from the previous surgery. We could now work in a wider bone crest that allowed us to avoid the use of narrow diameter implants.
As the sinus were highly pneumatized, sinus floor rise was performed in both of them using densification drilling protocol. (fig 9 & 10).

We also performed a relining graft using freeze-dried allograft trying to get a regular shape with smooth surface. As well as in the first surgery, the graft was covered with a collagen membrane. All parameters measured along the surgery suggested that waiting other 16 weeks for the tissues to heal would be enough.
A removal prosthesis was used by the patient as temporary restoration during all the process. Once that time passed, we uncovered the implants by repositioning soft tissue buccally (fig. 11).

Conventional healing abutments were used until suture was removed and then replaced by OMNI straight abutments. We chose these abutments due to their reduced diameter and strong prosthetic screw but also for its excellent soft tissue treatment, improving patients cleaning capacity (fig. 11 & 12).
We started then the prosthetic procedure, digitally scanning the scanbodies of the system (fig. 13 & 14).

The technician sent us the first framework to be checked: a milled aluminum structure used to verify passivity and replace – if needed – the position of any of the implants on the printed model (fig. 15.1 & 15.2). In our case, no changes were required and we went straight to the next step: Aesthetics.
As we needed to recover a big volume with this restoration – that involved teeth, soft and hard tissue – we decided to make a glass fiber framework. That option allowed us to considerably reduce final weight of the prosthesis while a different restoration material can be chosen depending on requirements of each tooth.

We made the decision to individualize teeth from 14 to 24 cementing individual Emax ceramic crowns to the glass fiber base, previously designed for that objective. That would improve the aesthetic of the restoration. For second bicuspids and first molars, we decided to apply composite directly on the glass fiber base for functional reasons.
Posterior area of the patients lower jaw was rehabilitated with dental implants before we met. We preferred not to restore our implants with rigid solutions when they’re facing implants with similar solutions. Glass fiber framework combined with composite will offer a more resilient behavior and a more pleasant feeling to the patient when occluding with the antagonist. Aesthetic gum was also made in composite (fig. 16).
Finally, restoration was finished and screwed in its final position (fig. 18-22). Further treatment will be needed on the lower jaw implants.

Full arch with immediate implantation, immediate extraction, maxillary Sinus Lift and bone graft

Written by feRKzzCTo0 on . Posted in Bone Regeneration, Clinical cases, Conventional Implantology, EL – Esthetic Line, Peng Dong

Doctor Peng Dong, the expert of tooth implantation in Peking University International Hospital and president of Beijing Hedu Stomatological Clinic Co., Ltd

Medical Case Report

Sex / Age: Female/37  
First Visit: 09/01/2014 Implant Surgery: 24/05/2018
Others Surgery (GBR…): 26/10/2017 Final Restoration: 11/10/2018
First Recall: 18/10/2018  
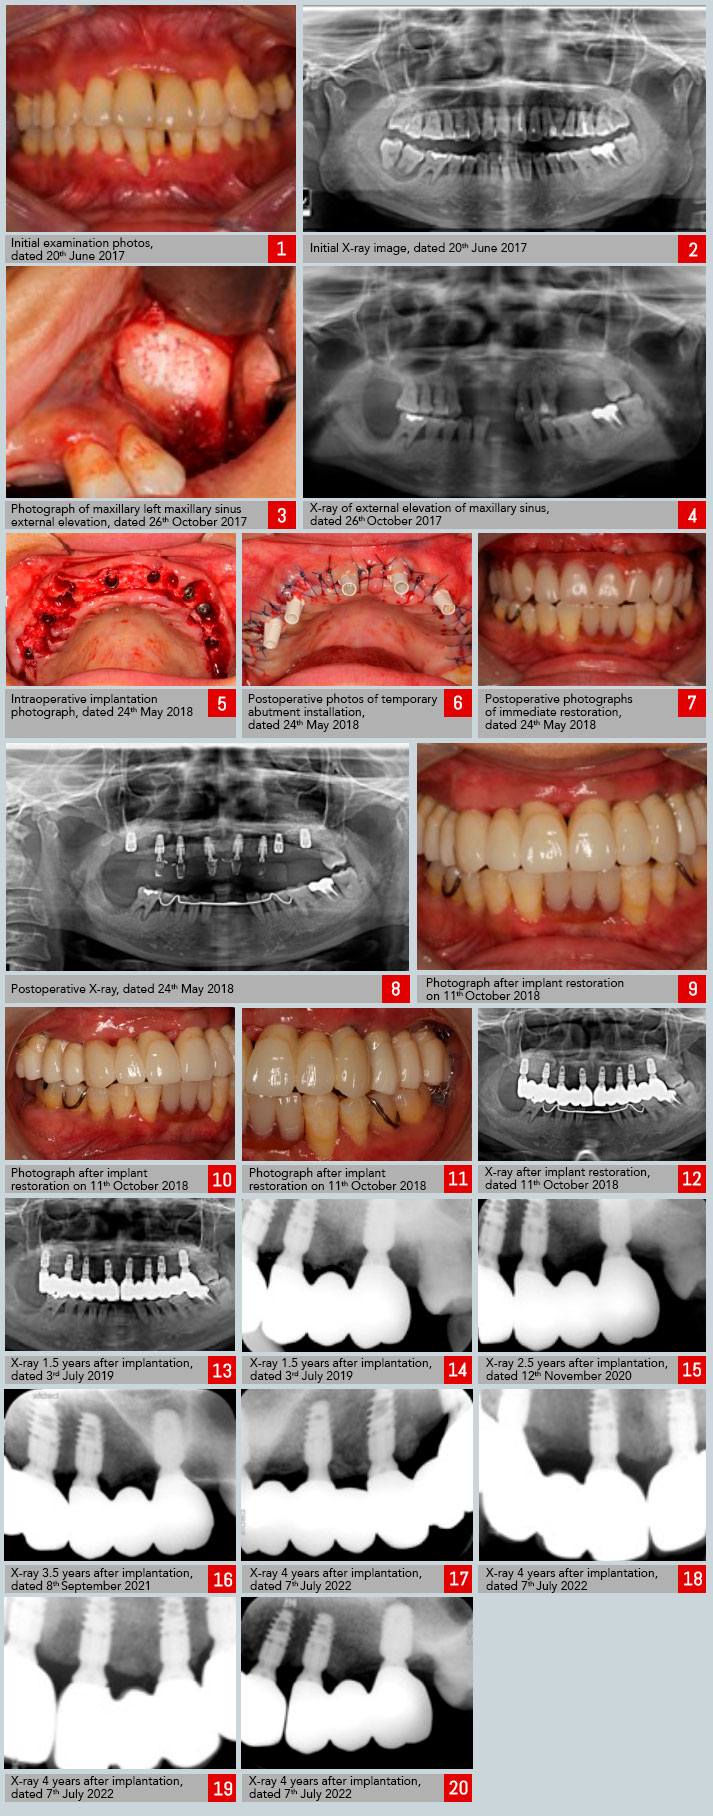
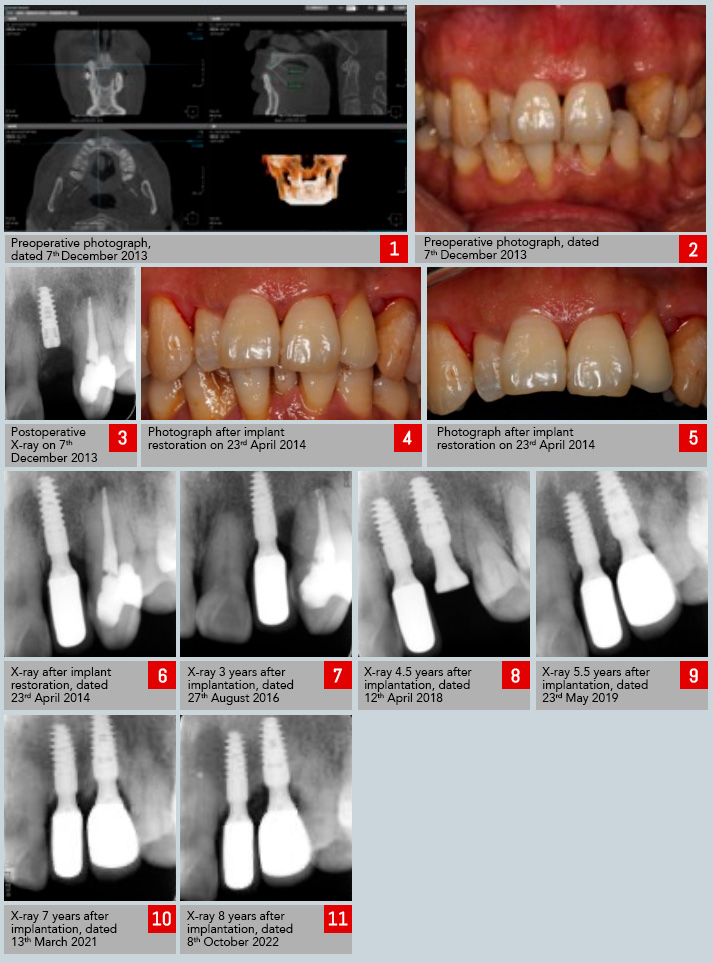
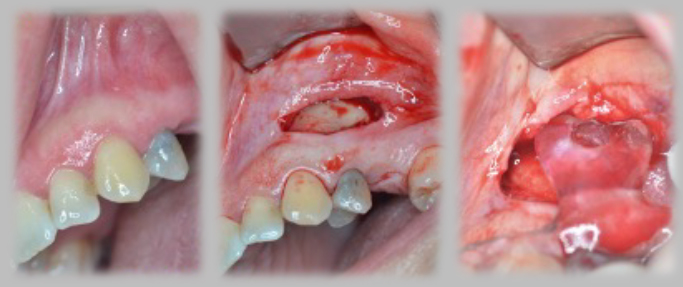
Chief Complaint: The patient seeks medical consultation for a loose maxillary tooth that was interfering with eating.
Consideration(s): Immediate implantation + Immediate extraction + Maxillary Sinus Lift + GBR
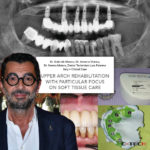
CASE OUTLINE

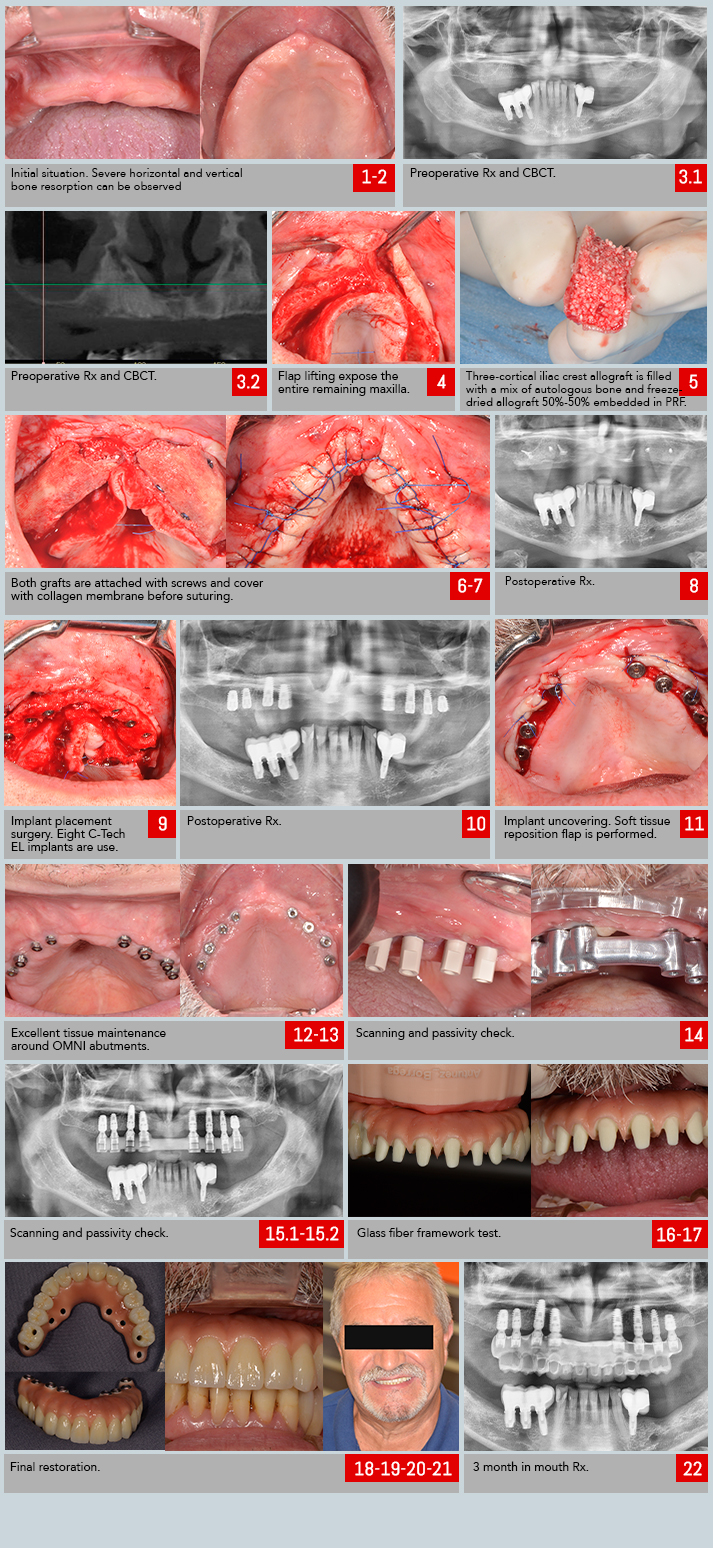
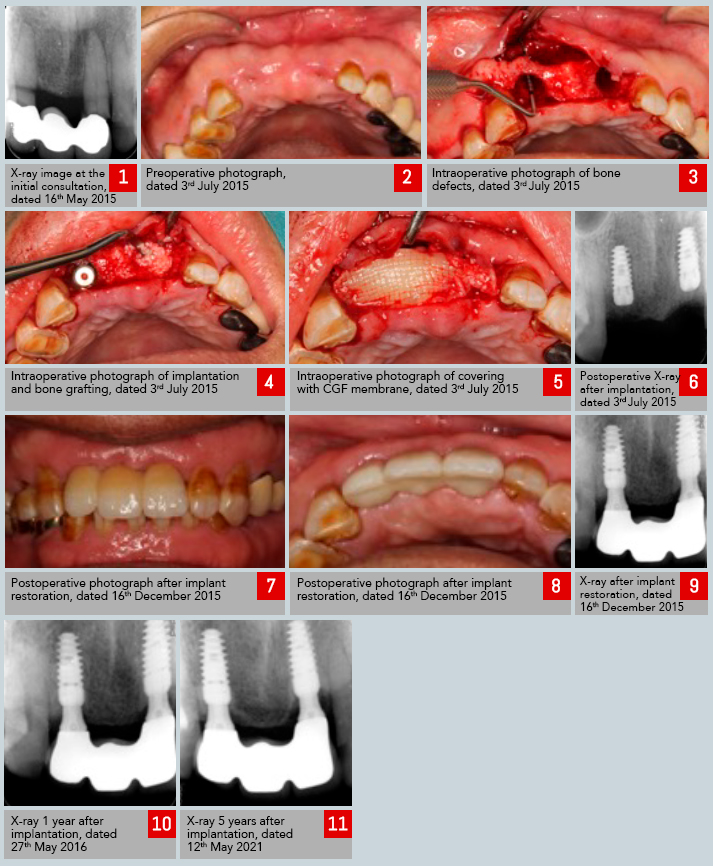
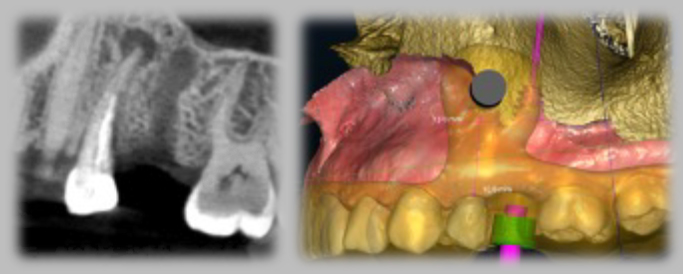
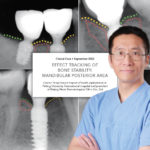
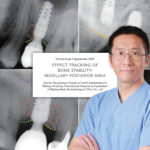
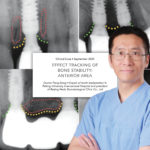
Significant absorption of the alveolar bone of the upper teeth is observed, with a large area of periapical radiolucency and root absorption reaching one-third to one-half of the length of the root. The diagnosis is invasive periodontitis. After a maxillary sinus lift procedure, the affected teeth were extracted, and immediate implantation of a total of eight C-Tech implants (Models: EL-3509, EL-4309, EL-5109) was performed. Subsequently, an oxidized zirconia full crown bridge will be used for restoration.

TREATMENT PLAN

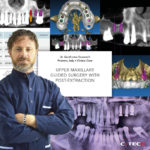
After a maxillary sinus lift procedure on both sides, with the alveolar bone width being ideal but lacking in height, the affected teeth will be extracted. Subsequently, immediate implantation of eight C-Tech implants (Models: EL-3509, EL-4309, EL-5109) will be performed. At the same time, bone grafting will be conducted to support the implants, and a fixed temporary denture will be placed, supported by the implants.

TREATMENT

1. Perform standard disinfection and drape the area with cloths. Administer local infiltration anesthesia to the maxillary operative site.
2. Perform a slanted incision in the upper right tooth 7, vertical incisions in the upper right teeth 6, 5, 4, and 3, internal incisions in the upper right second molar to the upper left teeth 2 to 1, and internal incisions in the upper left teeth 2, 3, and 4, and an internal incision in the upper left teeth 5, 6, and 7, and an internal incision in the upper left tooth 8. Elevate the flaps to expose the bone surface, remove the upper right teeth 6, 5, 4, and 3 and the upper left teeth 2, 3, and 4 with forceps, thoroughly cleanse the sockets, and use bone rongeurs and large round burs to carefully smooth and level the bone surface.
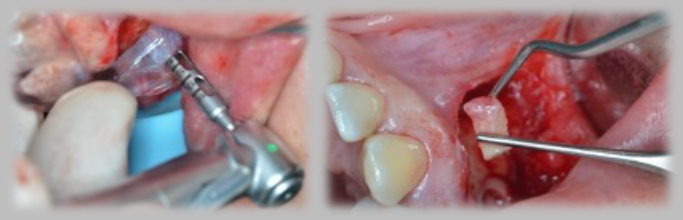
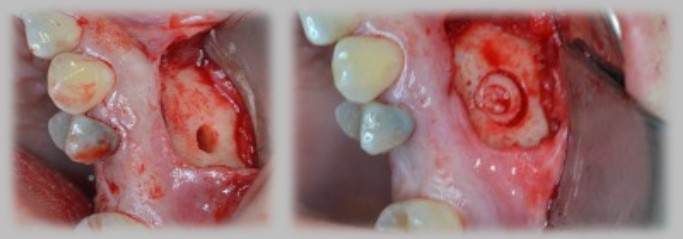
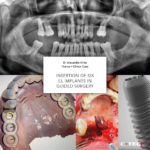
3. In the upper right tooth 1, prepare a borehole with a tapered drill and compress the bone to achieve a borehole size of 3.0*11mm. Implant a C-Tech implant (Model: EL-3509) with a PEEK base (Model: EL-4504P) at a torque of 45N. The marginal bone height is M1.5D1.5B1.5L1. In the upper right teeth 3, 1, and 3, prepare boreholes with tapered drills and compress the bone to achieve a borehole size of 3.0*11mm. Implant C-Tech implants (Model: EL-3509) with PEEK bases (Model: EL-4504P) at a torque of 45N. The marginal bone height for the left first molar (tooth 1) is M2.5D2B1.5L2, M1.5D1.5B-1.5L1.5 for the left third molar (tooth 3), and M2D1.5B2L1.5 for the right third molar (tooth 3). In the upper right tooth 4, prepare a borehole with a tapered drill and compress the bone to achieve a borehole size of 3.8*11mm. Implant a C-Tech implant (Model: EL-4309) with a PEEK base (Model: EL-4504P) at a torque of 45N. The marginal bone height is M1.5D2B1.5L1.5. In the upper left tooth 4, prepare a borehole with a tapered drill to achieve a borehole size of 3.8*11mm. Implant a C-Tech implant (Model: EL-4309) at a torque of 10N. The marginal bone height is M1.5D-8B1.5L1.5. In the upper right and left teeth 6, prepare boreholes with tapered drills to achieve a borehole size of 3.8*11mm. Implant C-Tech implants (Model: EL-5109) with cover screws. The marginal bone height for the left tooth 6 at a torque of 25N is M1D1B1.5L0.5, and M1.5D1.5B1.5L1.5 at a torque of 45N for the upper right tooth 6. Place Bio-Oss bone powder in the bone defects around the upper right teeth 3, 1, and left teeth 1, 3, 4 and the lip-side bone plate. Cover the bone grafting areas with membranes. Similarly, apply over the extraction site of the upper right tooth 6. Close the incisions with interrupted sutures to promote healing.
4. Use temporary abutments on the upper right teeth 4, 3, and 1 and the upper left teeth 1 and 3 to fabricate immediate upper dentures, adjust the occlusion, and polish the prosthetics.
5. After 9 months, take an impression, replace the restoration abutments, fix them with adhesive bonding, and provide permanent restoration with zirconia porcelain crowns and bridges. Left


2 implants restoration in the upper jaw, 8-year follow-up

Written by feRKzzCTo0 on . Posted in Clinical cases, Conventional Implantology, EL – Esthetic Line, Peng Dong

Doctor Peng Dong, the expert of tooth implantation in Peking University International Hospital and president of Beijing Hedu Stomatological Clinic Co., Ltd

Medical Case Report

Sex / Age: Male/55  
First Visit: 07/12/2013 Implant Surgery: 07/12/2013
Others Surgery (GBR…): Final Restoration: 23/04/2014
First Recall: 30/04/2014  
Chief Complaint: Missing an anterior tooth in the upper left region, the patient seeks fixed restoration.
Consideration(s):

CASE OUTLINE

The upper left tooth 2 is missing. It will undergo restoration using a C-Tech implant (Model: EL-3511). A subsequent application of an oxidized zirconia porcelain crown is planned for the final restoration.

TREATMENT PLAN

The width of the alveolar bone in the region of the upper left tooth 2 measures 5.7mm, and the height is 14.02mm, which is deemed to be ideal. The proposed approach is to implant a C-Tech implant (Model: EL-3511) in this area. The second stage of the surgery is scheduled for three months later.

TREATMENT

1、Perform standard disinfection and drape the area with cloths.
2、Administer local anesthesia to the upper left tooth 2, ensuring minimal discomfort. Create a horizontal incision along the crest of the alveolar ridge, extending from the near to far and central aspects. Carefully reflect the gingiva to expose the underlying bone surface.
3、Precisely position the C-Tech implant (Model: EL-3511) in the location of the upper left tooth 2. Gradually prepare a tapered borehole measuring 3.0x13mm to accommodate the implant, ensuring a precise fit. The implant is integrated with the healing abutment (Model: EL-5506HT) and anchored with a torque of 10N, achieving a marginal bone height of M3D4 B1.5L2. Securely suture the area.
4、After 4 months, take an impression and replace the restorative abutment with Model: EL-4504F. Permanently fix it with adhesive fixation, and apply an oxidized zirconia porcelain crown for long-lasting restoration.


Bridge on upper jaw with bone graft, 5-year follow-up

Written by feRKzzCTo0 on . Posted in Bone Regeneration, Clinical cases, Conventional Implantology, ND – Narrow Diameter, Peng Dong

Doctor Peng Dong, the expert of tooth implantation in Peking University International Hospital and president of Beijing Hedu Stomatological Clinic Co., Ltd

Medical Case Report

Sex / Age: Male/67  
First Visit: 16/05/2015 Implant Surgery: 03/07/2015
Others Surgery (GBR…):03/07/2015 Final Restoration: 26/12/2015
First Recall: 06/01/2016  
Chief Complaint: Loose fixed bridge on upper anterior teeth.
Consideration(s): GBR

CASE OUTLINE

Loose fixed bridge on upper anterior teeth. Carefully extract tooth 2, on the upper right side and tooth 1 on the upper left side. After the healing period, C-Tech implants will be placed in the sites of right upper tooth 2 and left upper tooth 1. After five months, an oxidized zirconia porcelain bridge will be used for the final restoration.

TREATMENT PLAN

For right upper tooth 2, the width of the alveolar bone is 7.6mm, and the height is 13.4mm. For left upper tooth 1, the width of the alveolar bone is 7.4mm, and the height is 14.5mm. C-Tech implants (Model: EL-4311) will be placed in both sites using conventional implantation with simple bone grafting. After a period of five months, the second phase of the surgery will be conducted.

TREATMENT

1. Extract venous blood for the preparation of CGF for later use.
2. Perform standard disinfection and drape the area with cloths. Administer painless local anesthesia to the upper front teeth region. Make horizontal incisions along the alveolar ridge from right upper tooth 2 to left upper tooth 1. Make incisions inside the grooves between right upper tooth 3 and left upper tooth 2. Perform a labial side vertical reduction on right upper tooth 3. Reflect the gingiva and thoroughly clean the wound, observing bone defects on the labial side of right upper tooth 2 and left upper tooth 1.
3. Precisely position the C-Tech implants (Model: EL-4311) in the locations of right upper tooth 2 and left upper tooth 1. Use tapered drills to create boreholes measuring 3.7*13mm for each implant. Implant the C-Tech implants with closure screws. Fill the bone defects and perforations on the labial side with a mixture of bone powder and CGF. Cover the gaps with membrane, and cover the alveolar ridge with another layer of membrane, followed by a layer of CGF membrane. Securely suture the area.
4. After six months, take an impression and replace the restorative abutments with Model: EL-4503F*2. Permanently fix them with adhesive fixation, and apply an oxidized zirconia porcelain bridge for long-lasting restoration.


Maxillary sinus lift with single implant, 6.5-year follow-up

Written by feRKzzCTo0 on . Posted in Clinical cases, Conventional Implantology, EL – Esthetic Line, Peng Dong

Doctor Peng Dong, the expert of tooth implantation in Peking University International Hospital and president of Beijing Hedu Stomatological Clinic Co., Ltd

Medical Case Report

Sex / Age: Male/39  
First Visit: 20/03/2015 Implant Surgery: 21/10/2015
Others Surgery (GBR…):21/10/2015 Final Restoration: 13/05/2016
First Recall: 26/05/2016  
Chief Complaint: Missing a posterior tooth in the upper left region, the patient requests fixed restoration.
Consideration(s): Maxillary sinus lift

CASE OUTLINE

The upper left tooth 6 is missing. After a maxillary sinus lift procedure, a C-Tech implant (Model: EL-5109) was placed. A subsequent application of an oxidized zirconia full crown is planned for final restoration.

TREATMENT PLAN

The width of the alveolar bone in the region of the upper left tooth 6 measures 7.8mm, with a bone height of 9.5mm. Following the maxillary sinus lift procedure, the C-Tech implant (Model: EL-5109) will be conventionally placed.

TREATMENT

1. Perform standard disinfection and drape the area with cloths. Administer local anesthesia to the upper left teeth 5 to 7 region.
2. Make incisions along the crest of the alveolar ridge for tooth 6 in the upper left region. Make additional incisions inside the grooves between teeth 5 and 7 in the upper left region. Carefully reflect the gingiva and gently scrape the bone surface.
3. Precisely position the C-Tech implant (Model: EL-5109) in the location of tooth 6 in the upper left region. Use a pilot drill and tapered drills to create boreholes measuring 4.6*8mm. Perform a sinus lift procedure by gently elevating the sinus membrane approximately 2mm using the tapping osteotome technique. Conduct a Valsalva maneuver to ensure the integrity of the sinus membrane. Insert gelatin sponge and implant the C-Tech implant (EL-5109) with closure screws. Apply a torque of 20N, achieving a marginal bone height of M1.5D1B1L1, and securely suture the area.
4. After 6 months, take an impression and replace the restorative abutment with Model: EL-4503F. Permanently fix it with adhesive fixation, and apply an oxidized zirconia full crown for long-lasting restoration.


Minimally-invasive surgery: Guided surgery implant placement combined with guided surgery apicectomy of adjacent tooth

Written by feRKzzCTo0 on . Posted in Clinical cases, Conventional Implantology, EL – Esthetic Line, GS – Guided Surgery, Guided Surgery

Dr Kevin Briffa B.Ch.D, M.Sc Oral Implantology (Fran.) – Mysmile Dental Care Centre, Malta

A 44 year old female patient presented to a private dental clinic requesting to replace her missing upper left second premolar. A CBCT radiograph was taken to plan the case. An incidental finding was that there was a periapical lesion associated with the roots of the asymptomatic upper left first premolar. This tooth had a root-canal filling and its roots curved towards the site where the implant would be placed. An intraoral scan was taken and this was superimposed onto the CBCT to plan the surgical guide.

The surgical guide was designed to serve for two purposes:
– for guided surgery implant insertion
– to locate the exact site of the periapical lesion to carry out minimally-invasive surgery when carrying out the apicectomy procedure

During the surgery appointment, an incision was made in the buccal mucosa at a level slightly crestal to the area of the periapical lesion. A flap was raised and the tooth-supported guide was placed onto the teeth, ensuring that it was fitting perfectly.

Trephine burs were used through the ‘window’ designed in the surgical guide to remove a ‘lid’ of bone overlying the periapical lesion. A significant part of the granuloma came out attached to the bony ‘lid’ when this was removed.

After completion of the apicectomy procedure and proper degranulation of the infected area, the bony ‘lid’ was placed back in its original place.

The apicectomy flap was sutured with PTFE sutures. The standard guided surgery routine procedure was subsequently carried out for the placement of a C-Tech EL 4.3x11mm implant to replace the missing upper left second premolar. The post-operative periapical radiograph shows the implant with its healing abutment and the completed apicectomy of the upper left first premolar, with the replaced bony ‘lid’ overlying the surgical site.


Effect tracking of bone stability: Mandibular posterior area

Written by feRKzzCTo0 on . Posted in Clinical cases, Conventional Implantology

by Doctor Peng Dong, the expert of tooth implantation in Peking University International Hospital and president of Beijing Hedu Stomatological Clinic Co., Ltd

Conclusion: 3-5 years of clinical tracking showed that in the cases of implantation in the mandibular posterior area, the bone height and bone density surrounding the C-tech implant were increased significantly, with a significant effect of bone wrapping, which fully presented the advanced design and precise processing of the implant.

Effect tracking of bone stability: Maxillary posterior area

Written by feRKzzCTo0 on . Posted in Clinical cases, Conventional Implantology

Doctor Peng Dong, the expert of tooth implantation in Peking University International Hospital and president of Beijing Hedu Stomatological Clinic Co., Ltd

Conclusion: 2-year clinical tracking of the cases of implantation in the maxillary posterior area showed that the effect of bone wrapping surrounding the C-tech implant was significant, with good root osteogenesis, which presented its advantage in the cases of maxillary sinus elevation.

Effect tracking of bone stability: Anterior area

Written by feRKzzCTo0 on . Posted in Clinical cases, Conventional Implantology

Doctor Peng Dong, the expert of tooth implantation in Peking University International Hospital and president of Beijing Hedu Stomatological Clinic Co., Ltd

Conclusion: 2-3 years of tracking clinical cases showed that the effect of bone wrapping surrounding the C-tech implant was significant, with increased bone density, which presented its advantage in the esthetic of anterior teeth.

Full arch rehabilitation: Digital guided surgery for upper loading and analogic in lower

Written by feRKzzCTo0 on . Posted in Catarina G. Rodrigues, Clinical cases, GS – Guided Surgery, Guided Surgery, Manuel D. Marques, MUA

Catarina G. Rodrigues, DDS, MSc  – Manuel D. Marques, DDS

A 74-year-old woman presented to a private practice with the chief complaint being that she did not want to use dentures anymore and have more comfort and better appearance. The clinical and radiographic examination revealed the absence of all teeth except the two upper canines (Fig 1-4).

Upper arch rehabilitation with particular focus on soft tissue care

Written by feRKzzCTo0 on . Posted in Clinical cases, Conventional Implantology, MUA

Dr. Gabriele Matera, Dr. Antonio Matera, Dr. Serena Matera, Dental Technician Luca Palermo

64-year-old female patient who came with an old mixed fixed-mobile prosthesis The patient is in good health and is a non-smoker. The patient expressed the desire to have all her teeth fixed and together with the patient we decide to extract all the dental elements, move away irreversibly and place 6 implants to make a screwed prosthesis.

Insertion of six EL implants in guided surgery

Written by feRKzzCTo0 on . Posted in Alexandre Minis, Clinical cases, EL – Esthetic Line, GS – Guided Surgery, Guided Surgery

Dr. Alexandre Minis, France

The patient is a 52-year-old male with no medical history.
Chronic periodontitis is stabilized.
Former smoker who quit following periodontal treatment.
Teeth 26, 16 and 17 were extracted. Considering that the available bone height was low, a bilateral sinus lift was performed by lateral approach.

Prefooter ENG